This Polish Pierogi Recipe is made with russet potatoes, sharp cheddar, onion, butter, flour, egg, and olive oil.
There’s something about a good Polish Pierogi Recipe that feels a little bigger than food. Not in a dramatic TV-chef way. I mean in that quiet, real-life way where the kitchen gets warm, the counter gets covered in flour, and suddenly you’re doing the kind of cooking that makes time feel different. Slower. Softer. A little messy too, if I’m being honest. This recipe always makes me think of the kind of meal that asks you to stay in the kitchen a bit longer and not complain about it too much because the payoff is very good. A bowl of potato filling, buttery onions, dough rounds lined up on a towel like tiny edible moons… it’s hard not to get a little attached.
The first time I made a proper Polish pierogi recipe from scratch, I was excited and mildly intimidated, which is usually how my best cooking stories begin. Pierogi have this reputation, don’t they? Like they belong to somebody’s grandma with supernatural patience and very strong opinions about dough thickness. I definitely had a moment where I thought, Who am I to make homemade pierogi? But then I started boiling potatoes, sautéing onions in butter, mixing the dough with my hands, and something shifted. It stopped feeling intimidating and started feeling comforting. Familiar, even, though I didn’t grow up pinching pierogi every weekend. And when those first pierogi hit the skillet and browned in butter, I had one of those ridiculous little kitchen moments where I nearly applauded myself. The edges got golden, the filling stayed creamy, and suddenly this pierogi recipe didn’t feel like a project anymore. It felt like a keeper. Sound familiar? Some recipes just sneak into your life like that.

Why you’ll Love this Polish Pierogi Recipe?
I think one of the best things about this Polish Pierogi Recipe is that it gives you the full comfort-food experience without needing fancy ingredients or restaurant tricks. You’ve got soft dough, creamy potato-cheese filling, buttery onions, and then that final pan-fry that makes the outside just a little crisp and golden. It’s cozy in layers, basically. First the soft dumpling part, then the rich filling, then the buttery finish. It’s not trying to be light and dainty, and honestly, I respect that. Sometimes dinner should be practical and leafy. Other times dinner should be pierogi fried in butter. Balance.
I also love that this pierogi recipe feels special without being impossible. Time-consuming? A little, yes. But not difficult in a scary way. It’s more hands-on than hard. There’s a rhythm to it—make the filling, make the dough, roll, cut, fill, pinch, boil, fry—and once you settle into that rhythm, it’s actually kind of calming. Or maybe “calming” is too romantic if your back starts hurting around pierogi number seventeen, but still. It’s satisfying. And the finished homemade pierogi look like something you really made, you know? Not assembled. Not opened from a package and warmed through. Made. I think that matters. Maybe not every day, but on holidays, cold weekends, or those times when you want your food to feel a little more meaningful? Absolutely.

Ingredient Notes
One thing I really appreciate about this Polish Pierogi Recipe is how basic the ingredients are. In a good way. It’s pantry and fridge stuff doing surprisingly emotional work. Potatoes, onions, butter, flour, cheese. Nothing trendy. Nothing that sounds like it belongs in a tiny jar with a ridiculous price tag. Just solid ingredients that know exactly what they’re here for. I’m always impressed by recipes like that. Humble on paper, unforgettable on the plate.
- Russet potatoes
Russets are the best choice for this Polish pierogi recipe because they mash up fluffy and soft without getting gluey. You want the filling thick and creamy, not slick or gummy. I’ve used other potatoes in all sorts of recipes, but here I really do think russets are worth it. They behave. - Sharp cheddar cheese
I know a more traditional version of a pierogi recipe might use farmer’s cheese, and that’s lovely too, but sharp cheddar gives this filling such a cozy, savory flavor. It melts into the potatoes and gives everything just enough tang to keep it interesting. Freshly grated is best because it melts more smoothly. Pre-shredded will work, sure, but sometimes it clumps like it’s going through something. - Onion
Onion sautéed in butter is one of those smells that makes a kitchen feel instantly more trustworthy. It brings sweetness and depth to the filling and keeps the potatoes and cheese from tasting too plain. It’s not a flashy ingredient, but wow, you’d notice if it were missing. - Butter
Butter carries a lot of this Polish Pierogi Recipe on its back. It softens the onions, flavors the filling, and then later helps fry the pierogi until they’re golden and a little crisp around the edges. I’m not saying butter is the main character, but it definitely has strong supporting-actor energy. - All-purpose flour
This is what gives you that soft, tender dough. Nothing fancy here. Just dependable flour doing exactly what it’s supposed to do. I like that. - Salt
Salt matters in both the dough and the filling. Potatoes are lovely, but they can be a little demanding when it comes to seasoning. Taste the filling. Then taste it again. Bland pierogi are just kind of heartbreaking. - Baking powder
It’s a small amount, but it helps the dough stay tender and not too dense. Tiny ingredient. Big contribution. - Egg
The egg helps bind the dough and gives it a little richness. It also makes the dough easier to work with, which is not nothing when you’re making homemade pierogi. - Olive oil
Olive oil adds softness and flexibility to the dough. It’s one of those ingredients you barely notice while making the recipe, but if it weren’t there, the dough wouldn’t feel quite as nice. - Warm water
Warm water helps the dough come together and makes it easier to knead. It just feels friendlier somehow. Technical? Maybe not. True? Yes. - Sour cream and chives for serving
These aren’t part of the dough or filling, but they matter. Sour cream cools everything down and makes the rich filling feel balanced. Chives add a little brightness. Together they make the whole plate feel finished instead of just very beige. And I say that with love.

How to Make Polish Pierogi Recipe?
A homemade Polish Pierogi Recipe is not exactly a throw-it-together Tuesday meal, and I think it’s only fair to say that upfront. It takes a little time. A little standing. A little patience. But it’s not hard in a “don’t try this unless you trained in a tiny European kitchen” kind of way. It’s more like a sequence. You do one thing, then the next, then the next, and before long you’ve got a tray full of homemade pierogi and flour on your sleeves. It’s actually pretty satisfying, if you can make peace with the mess.
Step 1: Boil the potatoes
Start by cooking the potatoes in boiling water until they’re fork tender. You want them soft enough to mash easily, because chunky potatoes make filling that’s harder to work with later. Once they’re cooked, drain them really well and transfer them to a large bowl. And I do mean really well. Too much water in the potatoes makes the filling loose, and loose filling makes pierogi a little grumpy.
Step 2: Make the filling
While the potatoes are cooking, melt the butter in a large skillet and sauté the onion until soft, about 5 to 6 minutes. Then pour the buttery onions into the bowl with the potatoes, add the shredded cheese, and mash everything together until the cheese melts in and the mixture gets thick and creamy. Add salt and pepper to taste. This is the point in the pierogi recipe where I always “sample” the filling more than once. Strictly for quality control, obviously. Just let it cool before filling the dough. Hot filling inside soft dough is a bit like putting wet socks in nice shoes. It causes problems.
Step 3: Make the dough
While the filling cools, stir the flour, salt, and baking powder together in a large bowl. In a separate bowl, whisk the egg and olive oil, then pour that into the flour mixture. Add the warm water one cup at a time, mixing with your hands. At first, the dough will feel sticky and maybe a little suspicious. Don’t panic. That’s normal. After kneading for 2 to 3 minutes, it should start pulling away from your hands and feeling smoother. This is where the Polish Pierogi Recipe asks for a tiny bit of trust.
Step 4: Roll and cut the dough
Flour your work surface, divide the dough into two balls, and keep one aside while you roll out the other. Roll the dough until it’s about 1/4 inch thick, then use a 3-inch round cutter to cut circles. Place them on a clean towel. Re-roll the scraps as needed, then repeat with the second ball. You should end up with around 24 dough circles. This is the stage where the recipe starts looking like actual homemade pierogi instead of random dough decisions, which I always find reassuring.
Step 5: Fill and seal the pierogi
Take a dough circle, stretch it slightly with your fingers, and add a spoonful of filling to the center. Fold it over like a taco and pinch the center shut first, then work your way out to the edges. Seal it really well. If you want, use the back of a spoon to scallop the edges a bit. It helps seal the filling in and gives the pierogi that lovely handmade look. This is definitely the fiddliest part of the Polish pierogi recipe, and yes, a few of them may look a little wonky. That’s fine. Wonky pierogi still taste like pierogi.
Step 6: Boil the pierogi
Bring a large pot of salted water to a boil and drop in about 6 pierogi at a time. Cook them until they float to the top, around 5 minutes. That floating part never stops being weirdly satisfying. Use a slotted spoon to lift them out and place them on a clean kitchen towel, then cover them with another towel so they don’t dry out while the rest cook.
Step 7: Fry them in butter
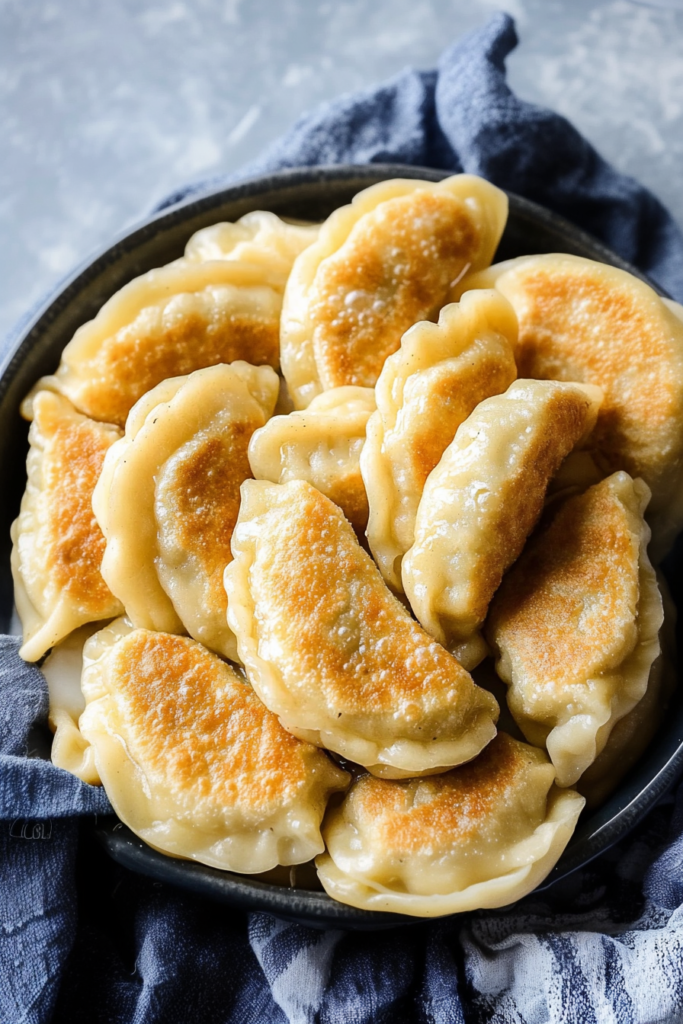
Now comes the part that, in my opinion, really seals the deal. Melt 2 tablespoons of butter in a skillet over medium heat, then fry the boiled pierogi for 2 to 3 minutes on the first side and 1 to 2 minutes on the second, until golden brown. You’ll probably need more butter as you go, and maybe a quick wipe of the skillet between batches. That’s normal. The buttery golden crust is what takes this pierogi recipe from “very good dumplings” to “okay, now I understand why people get emotional about these.”
Storage Options
One of the best things about a homemade Polish Pierogi Recipe is that the leftovers are actually worth being excited about. Maybe even a little more than they should be. Cooked pierogi store well in the fridge for up to 3 days in an airtight container, and when you reheat them in a skillet with a little butter, they get that lovely crisp edge all over again. I’m not trying to be controversial, but leftover homemade pierogi might even be better the next day. Or at least equally wonderful in a different mood.
This pierogi recipe also freezes really well, which is honestly such a gift after all the work of shaping them. You can freeze them after boiling or after fully cooking them. I like to freeze them in a single layer on a baking sheet first, then transfer them to a freezer bag once they’re firm. That keeps them from turning into one giant frozen dumpling sculpture. Then you can pull out a few at a time, which feels very smart and responsible. Future-you will be grateful. Possibly smug.
Variations & Substitutions
Once you’ve made a classic Polish Pierogi Recipe, it’s hard not to start thinking of variations. It just happens. Pierogi have that sort of inviting, adaptable energy. And while I do think the potato-cheese filling is classic for a reason, there’s definitely room to play depending on what you have, what you grew up with, or what kind of comfort food mood you’re in that day.
- Use farmer’s cheese instead of cheddar
If you want a more traditional filling for your Polish pierogi recipe, farmer’s cheese or quark is a great swap. It gives the filling a softer, tangier flavor and feels very classic. - Add extra sautéed onions on top
If you love onions, and I usually do, spooning extra buttery onions over the finished pierogi is fantastic. It’s not subtle, but subtle is not really why we’re here. - Use leftover mashed potatoes
If you’ve got leftover mashed potatoes, you can use them as a shortcut. Just make sure they’re not too loose. Very creamy holiday mashed potatoes can get a bit slippery for filling. - Add bacon
A little bacon in the filling or sprinkled on top is deeply good. Traditional in every household? Probably not. Delicious? Extremely. - Try different cheeses
Sharp cheddar is lovely in this pierogi recipe, but you can experiment with farmer’s cheese, mild cheddar, or a mix if that’s what you have. - Skip the frying step
You can absolutely eat pierogi after boiling them. They’ll be softer and more tender. I personally adore the buttery skillet finish, but boiled-only is still very good and very real. - Top with caramelized onions or sour cream
Both are classic and both make the pierogi feel complete. Some toppings are just meant to be there.
What to Serve With Polish Pierogi?
A Polish Pierogi Recipe can absolutely be the main event, but I also love building a whole plate around pierogi. They’re rich and filling, so it’s nice to pair them with things that either brighten everything up or lean fully into the comfort-food vibe. Depends on the day. Depends on whether I’m pretending to be balanced or not.
- Sour cream
This is the classic topping for a reason. Cool sour cream against hot buttery pierogi is just right. No need to improve on perfection too much. - Chopped chives
Chives add freshness and a little bite, which helps break up the richness of the filling and butter. - Caramelized onions
Sweet onions on top of homemade pierogi are one of those small upgrades that feel enormous once you taste them. - Sautéed cabbage
This is such a cozy pairing and works beautifully if you want the meal to feel a bit more traditional. - Kielbasa
If you want to turn the Polish pierogi recipe into a heartier dinner, kielbasa is a fantastic side. Smoky, savory, filling. Very good company for pierogi. - Simple salad
A green salad with a tangy dressing can be really nice if you want something crisp and fresh next to all that buttery goodness. - Apple sauce
This might sound unexpected if you didn’t grow up with it, but a little sweetness alongside savory homemade pierogi can be really lovely.
FAQ
Why is my dough so sticky?
That’s normal at first. After kneading, it should smooth out. If it’s still very sticky, add a little more flour, but go slowly. Too much flour can make the dough tougher than you want.
Do I have to fry them after boiling?
Nope. You can eat them right after boiling. But frying them in butter gives them that golden, slightly crisp outside that a lot of people, me included, really love.
What’s the best filling for pierogi?
That depends on who you ask. Potato and cheese is one of the most beloved fillings for a classic pierogi recipe, but sauerkraut, mushroom, and meat fillings are all popular too.
How do I keep the filling from leaking out?
Seal the edges really well and don’t overfill them. A good pinch around the edges makes a big difference. If one or two split anyway, welcome to homemade life.

If you’ve been wanting to try a homemade Polish Pierogi Recipe, I really think this one is worth the time. It’s cozy, filling, a little nostalgic, and incredibly satisfying in that deep comfort-food way. Soft dough, creamy filling, buttery golden edges… it’s hard not to fall for that combination.
And now I’m curious—when you make your homemade pierogi, are you going classic with butter and sour cream, or are you going full comfort-mode with onions, chives, and bacon too?

Polish Pierogi Recipe
Ingredients
For the Filling
- 2.5 lb russet potatoes peeled and diced into large chunks
- 8 oz shredded sharp cheddar cheese preferably freshly grated
- 1 small onion minced
- 1/2 c butter plus more for frying
- Salt and black pepper to taste
For the Dough
- 4 1/2 c all-purpose flour
- 1 tsp salt
- 1/2 tsp baking powder
- 1 egg
- 2 tsp olive oil
- 2 c warm water
For Serving
- Melted butter
- Sour cream
- Chopped chives
Instructions
- Place the potatoes in a large pot of boiling water and cook until fork tender. Drain thoroughly, then transfer the potatoes to a large mixing bowl.
- While the potatoes are cooking, melt the butter in a large skillet over medium heat. Add the minced onion and sauté for 5 to 6 minutes, or until softened.
- Pour the butter and onion mixture over the cooked potatoes. Add the shredded cheese, then mash the mixture until smooth and well combined. Season with salt and black pepper to taste. Set aside and allow the filling to cool before assembling the pierogi.
- To prepare the dough, combine the flour, salt, and baking powder in a large bowl.
- In a separate bowl, whisk together the egg and olive oil. Pour the egg mixture into the flour mixture and stir to combine.
- Add the warm water gradually, 1 cup at a time, mixing with your hands until a dough forms. Knead the dough for 2 to 3 minutes, or until it becomes smooth and begins to pull away from your hands.
- Lightly flour a clean work surface or silicone mat. Transfer the dough to the surface and divide it into two equal portions.
- Working with one portion at a time, roll the dough to approximately 1/4-inch thickness. Use a 3-inch round cutter to cut out circles. Place the dough circles on a clean dish towel. Re-roll the scraps as needed, then repeat with the remaining dough.
- To assemble each pierogi, gently stretch a dough circle slightly with your hands. Place a spoonful of the cooled potato filling in the center. Fold the dough over the filling to create a half-moon shape, then press the edges firmly together to seal. Use the back of a spoon to create a scalloped edge, if desired. Repeat with the remaining dough and filling.
- Bring a large pot of salted water to a boil. Cook the pierogi in batches of 6, boiling them for approximately 5 minutes, or until they float to the surface.
- Remove the cooked pierogi with a slotted spoon and transfer them to a clean kitchen towel. Cover them with another towel to prevent them from drying out while the remaining pierogi cook.
- To finish, melt 2 tablespoons of butter in a large skillet over medium heat. Add the boiled pierogi and cook for 2 to 3 minutes on the first side. Turn them over and cook for 1 to 2 minutes more, or until golden brown. Add additional butter as needed between batches.
- Serve warm with melted butter, sour cream, and chopped chives, if desired.
Notes