Bread flour, milk, honey, butter, minced turkey, potato, carrot, onion, ginger, garlic, curry powder, apple, soy sauce, eggs, and panko.
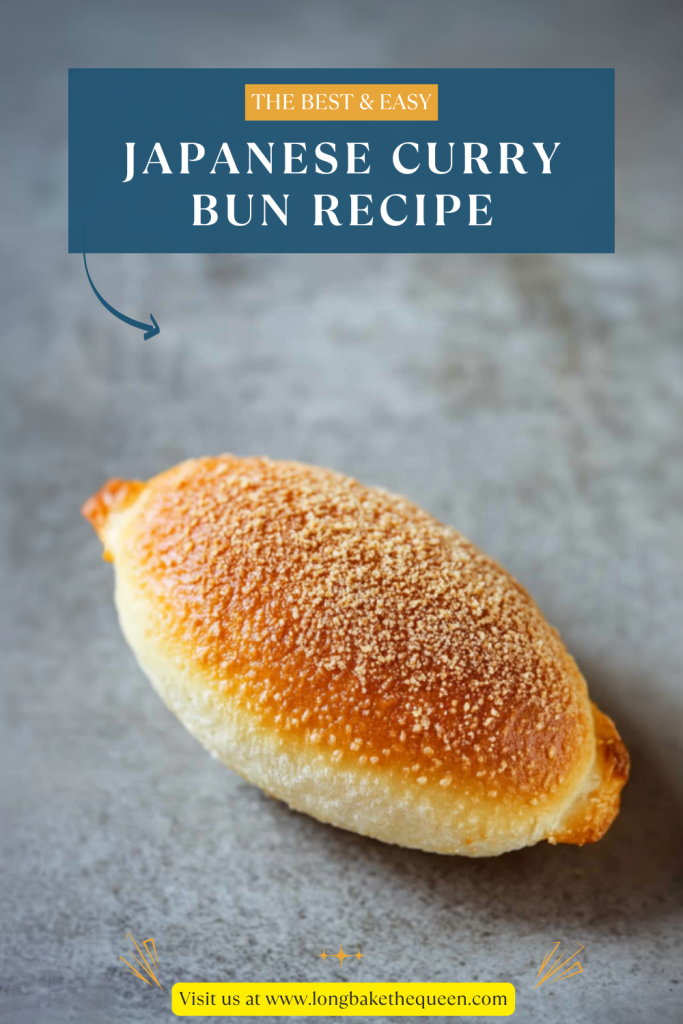
The first time I had a Japanese curry bun, I remember standing there with the wrapper still in my hand, trying to understand how something so simple-looking could be that good. It was crispy on the outside, soft in the middle, and filled with warm curry that tasted like comfort food with a little bakery magic tucked inside. That bite stayed with me. Not in a dramatic movie-scene way, but close enough. Ever had a snack that made you think, “Okay, wait, why don’t I eat this all the time?” That is exactly the feeling behind this Japanese Curry Bun Recipe.
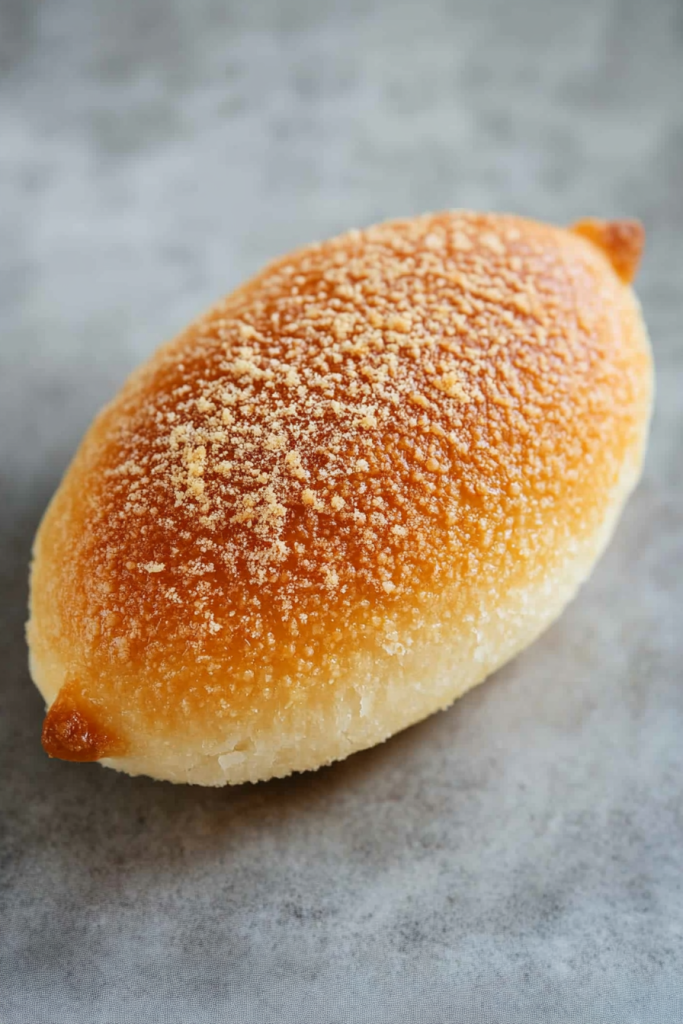
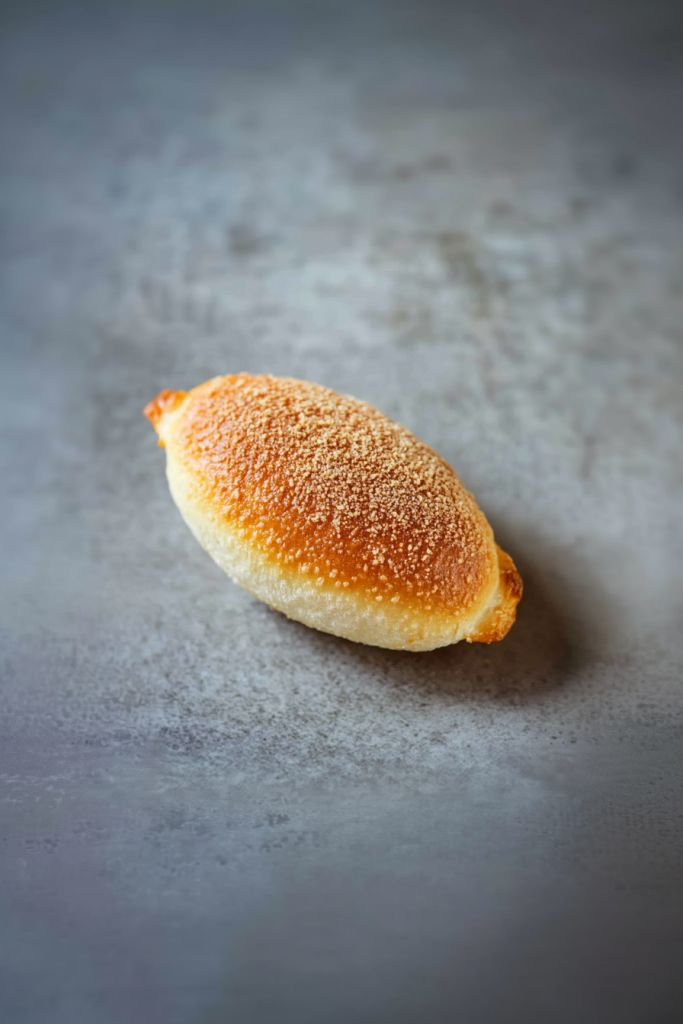
I have always loved foods that feel like they belong to a particular moment. A warm bun from a bakery window. A quick bite from a convenience store after walking around all afternoon. Something golden and fried that you absolutely meant to share but, well… things happen. Kare pan, also known as Japanese curry bread, has that kind of charm. It feels casual, but not boring. Cozy, but still a little exciting. And when you make it at home, there is this tiny proud feeling when you pull the buns from the oil and see that panko crust turning golden. Like, look at us, making bakery food in a regular kitchen.
I won’t pretend this Japanese Curry Bun Recipe is a quick little five-minute snack. It is not. There is dough to knead, curry filling to cook, buns to shape, panko crumbs that will somehow end up on the counter, and frying oil to manage. But honestly? That is part of why I like it. It feels like a real kitchen project, the kind you make on a weekend when you have time to put on music and fuss a little. Not stress-fuss. More like cozy-fuss. You know what I mean?
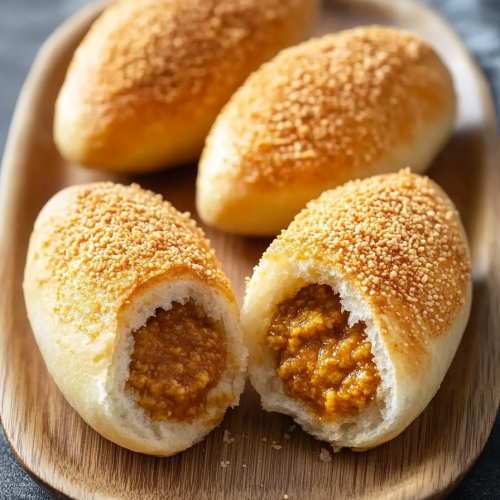
The filling is what makes these homemade Japanese curry buns feel special. It has minced turkey, potato, carrot, onion, ginger, garlic, curry powder, ketchup, soy sauce, and grated apple. Yes, grated apple. I know that might sound a bit unexpected if you have not made Japanese-style curry before, but it adds a gentle sweetness that softens the spices and makes everything taste rounder. It is not “apple dessert” sweet. It is more like a quiet little background sweetness that makes you wonder why the curry tastes so cozy.
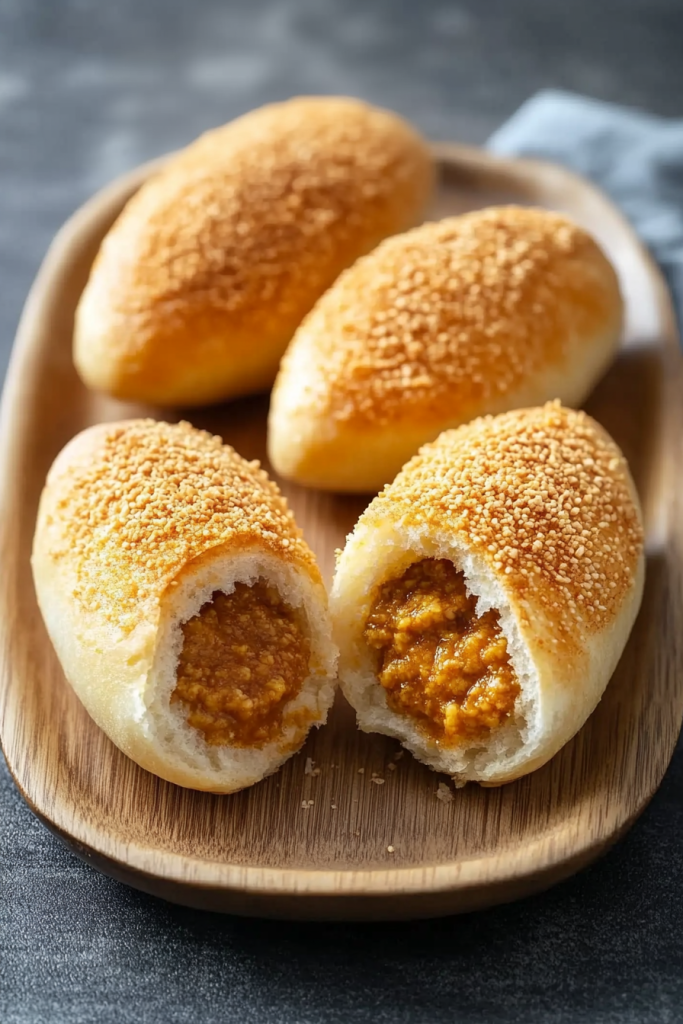
And then there is the panko. That crispy panko coating is not just for looks. It is what gives these crispy panko curry buns their signature crunch. You bite through the golden outside, then you hit the fluffy bread, then the mild curry filling. It is a whole little journey, honestly. A delicious one. These buns are best fresh and warm, preferably when you are trying very hard not to burn your mouth but also not doing a great job at waiting. Sound familiar?
Why you’ll Love this Japanese Curry Bun Recipe?
This Japanese Curry Bun Recipe is easy to love because it gives you so much in one bite. You get crunch, softness, warmth, and savory curry filling all wrapped into one golden bun. It is the kind of recipe that feels a little extra, but in a good way. The panko outside fries up crisp and light, the bread inside stays soft and fluffy, and the filling is thick enough to stay tucked inside where it belongs. Mostly. As long as we seal the buns properly, which we will.
What I really like about Japanese curry bread is that it is not aggressively spicy. Japanese curry usually has this mild, warm, slightly sweet flavor that feels comforting instead of intense. The curry powder gives the filling warmth, the ginger and garlic add flavor, the soy sauce brings depth, the ketchup adds a little tangy sweetness, and the apple smooths everything out. It is savory, but gentle. Flavorful, but not bossy. Some curries shout; this one sort of gives you a warm blanket and says, “You good?”
The dough is another reason this recipe works so well. It is made with bread flour, warm milk, honey, yeast, salt, and butter, so it has a soft, slightly rich texture that pairs beautifully with the curry filling. If bread dough makes you nervous, I get it. Dough can be moody. Some days it rises fast, some days it acts like it has never heard of yeast. But this dough is pretty friendly, especially with a stand mixer doing the kneading. You just have to give it time.
These homemade curry buns also make a generous batch, about 16 buns, which is nice if you are feeding family, sharing with friends, or stocking up for later. I say “sharing,” but let’s be honest, sharing warm curry buns takes character. They are best fresh, but they reheat surprisingly well in the oven or air fryer. And there is something very satisfying about having a curry bun waiting for you the next day. Like a tiny edible reward for yesterday’s effort.

Ingredient Notes
The ingredients in this Japanese Curry Bun Recipe are split into three important parts: the curry filling, the bun dough, and the crispy panko breading. It might look like a lot when you first read the list, but once you break it down, it feels much more manageable. The filling needs to be thick and flavorful. The dough needs to be soft but strong enough to hold the curry. And the breading needs panko, because panko is what gives kare pan that beautiful crunch.
- Yellow Onion: Onion is the base of the curry filling, and it helps build that savory sweetness from the start. Cook it until it turns translucent, then let it continue with the ginger and garlic until everything smells warm and golden. I know it is tempting to rush onions sometimes, especially when you are hungry, but giving them a little time makes the filling taste deeper.
- Ginger: Grated ginger adds warmth and a tiny bit of brightness. It keeps the curry filling from tasting too heavy. A thumb-sized piece is usually enough. Ginger can be bold, so I like it present but not taking over the whole filling like it owns the pan.
- Garlic: Garlic adds that familiar savory flavor that makes the kitchen smell amazing. Grating it helps it blend smoothly into the filling. Just keep the heat gentle enough so it turns golden, not burnt. Burnt garlic has a very dramatic personality, and not in a helpful way.
- Potato: Potato makes the filling hearty and helps absorb extra moisture. That is important because the curry filling for Japanese curry buns needs to be thick. If it is too saucy, shaping the buns becomes a bit of a circus. A delicious circus, maybe, but still one we want to avoid.
- Carrot: Carrot adds sweetness, color, and a soft bite. It is a classic fit with Japanese curry flavor. Cut it into small cubes so it cooks evenly with the potato and fits nicely inside the dough. Big chunks make filling harder, and we do not need that kind of drama.
- Water: Water helps the potato and carrot cook until tender. By the time the vegetables are soft, most of the liquid should be gone. If you still see liquid in the pan, cook it uncovered until it dries out. For this Japanese Curry Bun Recipe, a thick filling is not optional. It is the difference between neat little buns and curry trying to escape.
- Minced Turkey: Minced turkey makes the filling savory without feeling too heavy. It cooks quickly and blends nicely with the vegetables. You can swap in ground chicken, pork, or beef if you prefer. Turkey is a little lighter, though, and it lets the curry flavor come through clearly.
- Ketchup: Ketchup might seem like a funny ingredient at first, but it works. It adds sweetness, tang, and a little tomato flavor. Japanese-style curry often has that sweet-savory balance, and ketchup helps bring that in without making things complicated.
- Soy Sauce: Soy sauce adds saltiness and umami, which gives the filling more depth. It makes the curry taste more complete. Since soy sauce is salty, go gently with extra salt until you taste the filling.
- Grated Apple: Grated apple adds soft sweetness and helps round out the curry. Grate it right before using so it does not brown too much. It might sound quirky, but it is one of those little touches that makes homemade Japanese curry buns taste warmer and more balanced.
- Curry Powder: Curry powder gives the filling its main flavor and color. Use one you enjoy, because different curry powders can taste quite different. Some are mild and sweet, some are earthier, and some have more heat. The flavor of your curry powder will definitely show up.
- Cornstarch: Cornstarch thickens the curry slurry and helps turn the filling into a scoopable mixture. This is very important. A runny filling can leak while shaping or frying, and leaked curry in frying oil is not anyone’s dream.
- Bread Flour: Bread flour gives the buns structure and a soft chew. Since the dough has to hold filling and then be breaded and fried, bread flour is a great choice. It gives the buns enough strength without making them tough.
- Salt: Salt balances the flavor of the dough. Without it, the bread can taste flat, even with curry inside. It is a small amount, but it matters.
- Honey: Honey adds a gentle sweetness to the dough and helps make the bread taste soft and warm. It does not turn the buns into dessert; it just balances the savory curry filling nicely.
- Instant Yeast: Instant yeast helps the dough rise and become fluffy. Since it is instant yeast, it can be mixed right into the dough ingredients. Just make sure it is fresh. Old yeast can be stubborn, and dough that refuses to rise is a particular kind of kitchen heartbreak.
- Warm Milk: Warm milk makes the dough richer and softer. It should be warm, not hot. If it is too hot, it can damage the yeast. Think warm enough to feel cozy on your finger, not hot enough to make you pull your hand back.
- Softened Butter: Butter makes the dough tender and richer. It is added gradually after the dough has kneaded for a while. At first, the dough may look slightly messy when the butter goes in, but keep going. It comes together. Dough likes to look dramatic before behaving.
- Eggs: Eggs are used to help the panko stick to the filled buns. Coat each bun well so the breadcrumbs can cling evenly. This step gives the buns that crisp outer shell after frying.
- Panko Breadcrumbs: Panko is one of the stars of this Japanese Curry Bun Recipe. It is lighter and flakier than regular breadcrumbs, which gives the buns their crisp, golden coating. Regular breadcrumbs can work in a pinch, but panko gives that classic kare pan texture.
How to Make Japanese Curry Bun Recipe?
This Japanese Curry Bun Recipe has several steps, but none of them are impossible. Think of it like building something in layers. First, you make a thick curry filling. Then you make soft bread dough. After that, you wrap the filling, coat the buns in egg and panko, let them puff a little, and fry until golden. It is a project, yes. But it is the kind of project that rewards you with crispy curry-filled bread, so I feel like we can forgive it.
Step 1: Prepare the curry slurry
Start by mixing the curry powder, cornstarch, and water in a bowl until smooth. Set it aside while you cook the filling. This little curry slurry does two things: it flavors the filling and thickens it. Mixing it before adding it to the pan helps avoid clumps, which is always a good thing. Nobody wants a dry little pocket of curry powder hiding in the filling.
Step 2: Cook the onion, ginger, and garlic
Heat a little oil in a pan and add the chopped onion. Cook until it turns translucent, then add the grated ginger and garlic. Continue cooking until everything smells fragrant and turns lightly golden. This step sets the tone for the filling. It is the kind of smell that makes people wander into the kitchen asking what is going on, which is usually a good sign.
Step 3: Add the potato and carrot
Add the cubed potato, cubed carrot, water, and a little salt. Cover the pan and cook until the potato is soft and fully cooked. The carrot should be tender too. By the end, most of the water should have disappeared. If there is still liquid in the pan, remove the lid and cook until the mixture dries out. Remember, the filling for Japanese curry bread should be thick, not soupy.
Step 4: Add the minced turkey
Add the minced turkey to the pan and sprinkle with a little salt. Cook until the meat is fully cooked, breaking it into small pieces as it cooks. You want the meat evenly mixed with the vegetables so every bun gets a balanced filling. No one wants one bun packed with meat and another bun full of lonely potato.
Step 5: Add ketchup, soy sauce, and grated apple
Add the ketchup, soy sauce, and freshly grated apple. Stir everything together until well combined. This is where the filling starts to taste rounded and cozy. The ketchup brings tangy sweetness, the soy sauce adds savory depth, and the apple softens the curry flavor. It is a slightly unexpected trio, but it works beautifully.
Step 6: Thicken the curry filling
Pour in the prepared curry slurry and mix well. Continue cooking until the filling thickens and becomes scoopable. It should not be loose or watery. Once thick, remove it from the heat and let it cool completely. This is important. Warm filling can make the dough sticky and harder to seal, and we are trying to keep things manageable here.
Step 7: Make the bun dough
Add the bread flour, salt, honey, instant yeast, and warm milk to the bowl of a stand mixer. Mix until everything comes together, then knead for about 10 minutes. Lower the speed and add the softened butter one piece at a time. Once the butter is incorporated, knead for another 5 minutes at normal speed. The dough should become smooth, stretchy, and soft.
Step 8: Let the dough rise
Shape the dough into a ball and place it in a greased bowl. Cover the bowl tightly with cling film and let the dough rise until doubled in size. This usually takes around 1 to 2 hours, depending on your kitchen. If your kitchen is warm, it may rise faster. If it is chilly, it may take longer. Dough has its own little schedule, and sometimes we just have to go along with it.
Step 9: Prepare the breading station
Whisk the eggs in one shallow plate and pour the panko breadcrumbs into another plate. Set both nearby before you start assembling the buns. This makes the process smoother, because once your hands get involved with dough and filling, you will not want to go hunting for breadcrumbs. Ask me how I know.
Step 10: Divide the dough
Place the risen dough on your work surface and gently shape it into a log. Cut it into 16 equal pieces, then roll each piece into a ball. Cover the dough balls with cling film so they do not dry out while you work. Dry dough is harder to seal, and sealing matters a lot in this Japanese Curry Bun Recipe.
Step 11: Roll each dough ball
Take one dough ball and flatten it slightly. Roll it into a circle about 3.5 inches or 9 cm wide. Try to make the edges thinner than the center. A slightly thicker center helps hold the filling, while thinner edges make sealing easier. It does not have to be perfect. Mine are rarely perfect circles, and they still taste wonderful.
Step 12: Fill and seal the buns
Scoop some cooled curry filling into the center of the dough circle. Try not to overfill, even though it is tempting. Too much filling makes the bun harder to close and can cause leaking while frying. Wet the edges lightly with water, then fold and pinch the seams together tightly. Pinch and fold again for extra security. A good seal is your best friend here.
Step 13: Coat with egg and panko
Dip each filled bun into the whisked egg, coating it well, then roll it in panko breadcrumbs until fully covered. Place the breaded bun on a baking tray lined with baking paper. Repeat with the remaining buns. The panko coating is what gives these crispy panko curry buns their golden, crunchy outside, so coat them generously.
Step 14: Let the breaded buns rest
Cover the breaded buns with cling film and let them rest for about 30 minutes, or until they puff up slightly. They do not need to double in size. You just want them to look a little fuller and more relaxed before frying. It is a short rest, but it helps.
Step 15: Fry the curry buns
Heat plenty of oil in a pot over medium-low heat. Carefully place a bun into the oil and gently roll it right away so it cooks evenly. Fry for about 5 minutes, or until golden brown and fully cooked. Work in batches and avoid overcrowding the pot. If the oil temperature drops too much, the buns can absorb more oil and turn greasy instead of crisp.
Step 16: Drain and serve
Remove the fried buns from the oil and place them on kitchen paper to absorb extra oil. Continue with the remaining buns. Serve the Japanese curry buns fresh and warm. Hot, if you can handle it, though I will not be responsible for impatient first bites. That crispy outside and warm curry center are very persuasive.
Storage Options
This Japanese Curry Bun Recipe is at its best when served fresh and warm. The panko coating is crispest right after frying, and the bread is soft and fluffy with warm curry tucked inside. That first bite is really the whole reward for the kneading, shaping, and frying. If you can serve them right away, do it. Maybe eat one standing at the counter. I won’t tell.
If you have leftovers, let the buns cool completely first. Store them in an airtight container at room temperature for up to 1 day. After that, move them to the refrigerator, where they will keep for about 3 to 4 days. The coating will soften as they sit, but reheating helps bring some of the crispiness back.
To reheat, place the buns in a 400°F or 200°C oven for a few minutes until warmed through and crisp again. An air fryer also works beautifully for reheating Japanese curry bread. I would avoid the microwave if you can. It warms the bun, yes, but it makes the panko soft, and the crispy coating is kind of the point. Still edible, of course, but not quite the same.
You can also freeze cooked homemade curry buns. Let them cool completely, wrap them well, and freeze in a freezer-safe bag or container for up to 1 month. Reheat in the oven or air fryer until hot and crisp. They may not taste exactly like fresh-fried buns, but having curry buns in the freezer feels like a small act of kindness toward your future self.
Variations & Substitutions
This Japanese Curry Bun Recipe is flexible once you understand the basic idea: thick curry filling, soft dough, panko coating, and frying. You can change the protein, add vegetables, increase the spice, or use a different cooking method. The classic fried version gives the best crunch, but I do think there is room to make it fit your kitchen. Recipes should be helpful, not bossy.
- Use Ground Chicken, Pork, or Beef: Minced turkey works well, but ground chicken, pork, or beef can be used instead. Chicken keeps the filling light, pork makes it richer, and beef adds a deeper flavor. Whatever you choose, cook it fully and break it into small pieces so the filling is easy to scoop.
- Make It Vegetarian: For vegetarian Japanese curry buns, skip the turkey and use extra potato, carrot, mushrooms, peas, finely chopped tofu, or plant-based ground meat. Just keep the filling thick. A loose filling will try to escape during shaping, and nobody needs that mess.
- Add More Vegetables: Peas, corn, mushrooms, or finely chopped bell pepper can be added to the curry filling. Keep the pieces small so the buns are easier to fill and seal. Large chunks can make the dough harder to close, and then suddenly you are wrestling with bread dough. Not ideal.
- Make It Spicier: Japanese curry is usually mild, but you can add chili powder, cayenne, or a little hot sauce if you want more heat. Start small, because curry filling can sneak up on you. There is cozy spice, and then there is “why did I do this?” spice. Choose wisely.
- Use Japanese Curry Roux: You can use Japanese curry roux instead of the curry slurry for a shortcut. Add it gradually and adjust the thickness as needed. Curry roux can be salty, so taste the filling before adding more salt.
- Bake Instead of Frying: You can bake the buns if you want a lighter version. Brush or spray the breaded buns with oil and bake at 375°F until golden and cooked through. They will not be as crisp as fried kare pan, but they will still taste good and feel a bit easier.
- Air Fry the Buns: Air frying is another good option. Lightly spray the breaded buns with oil and air fry until golden and cooked through. The time will depend on your air fryer, so check them as they cook. This gives a nice crisp finish with less oil.
- Try Different Curry Powder: Different curry powders can change the whole flavor of the filling. Some are mild and sweet, while others are stronger, earthier, or spicier. Use one you like, and adjust the seasoning if needed.
What to Serve With Japanese Curry Bun Recipe?
This Japanese Curry Bun Recipe can stand on its own, but it also pairs nicely with simple sides. Since the buns are fried, crispy, and filled with curry, I like serving them with something fresh, light, or tangy. It keeps the meal balanced and makes the buns feel less like a snack you accidentally turned into dinner. Though, honestly, that happens.
- Green Salad: A simple green salad is a lovely pairing with Japanese curry buns. Sesame dressing, ginger dressing, or a light vinaigrette works well. The freshness cuts through the richness of the fried panko coating.
- Cucumber Salad: A chilled cucumber salad adds crunch and freshness. Toss sliced cucumber with rice vinegar, sesame oil, and a pinch of salt for something simple and refreshing. It is a nice contrast to the warm curry filling.
- Miso Soup: Miso soup makes the meal feel cozy without being too heavy. It is warm, light, and comforting, which makes it a natural match for Japanese curry bread.
- Pickled Vegetables: Pickled cucumber, radish, carrots, or Japanese pickles add tang and crunch. That little acidic bite balances the fried coating beautifully. Plus, pickles make almost any savory snack feel more complete.
- Rice Bowl Sides: If you want to turn these buns into a fuller meal, serve them with a small rice bowl, edamame, or steamed vegetables. Keep the sides simple because the buns already have plenty going on.
- Iced Tea: Iced green tea, barley tea, or unsweetened iced tea pairs nicely with the curry flavor. It keeps the meal refreshing without adding more sweetness.
- Japanese Soda or Sparkling Water: A fizzy drink is fun with crispy curry buns. Ramune, sparkling water, or a light soda gives the whole meal a playful snack-shop feeling.
- Fresh Fruit: Orange slices, grapes, melon, or berries can add a fresh sweet contrast. It sounds simple, but fruit next to warm savory buns is actually really nice.
FAQ
Why does the filling need to be thick?
The filling needs to be thick so it stays inside the dough. If the curry is too watery, it can leak while shaping or frying. That is why this recipe cooks off extra liquid and uses cornstarch in the curry slurry. Thick filling makes homemade Japanese curry buns much easier to seal.
Can I bake Japanese curry buns instead of frying them?
Yes, you can bake them. Brush or spray the breaded buns with oil and bake at 375°F until golden and cooked through. They will not be as crisp as fried Japanese curry buns, but they will still be tasty. Fried is classic, baked is convenient. Both have their moment.
Can I use regular breadcrumbs instead of panko?
You can use regular breadcrumbs if that is all you have, but panko gives the best texture. Panko is lighter and flakier, so it creates the crisp coating that makes kare pan so good. Regular breadcrumbs create a heavier crust.
Why did my buns open while frying?
The buns may open if the filling was too wet, the dough edges were not sealed tightly, or too much filling was added. Use cooled, thick filling, wet the edges lightly, and pinch the seam firmly. Then pinch and fold again. That double seal really helps keep the curry inside.
This Japanese Curry Bun Recipe is one of those recipes that feels extra satisfying because you really make it from the ground up. You cook the filling, knead the dough, shape each bun, coat it in panko, and fry it until golden. It takes some effort, but when you bite into that crispy outside and find warm curry inside, it all makes sense.
I love these homemade Japanese curry buns because they feel cozy and fun at the same time. They are soft, crispy, savory, mildly sweet, and just a little bit special. Not fancy in a stiff way. More like bakery-window special. The kind of food you make once and then start thinking about again a few days later.
Try this Japanese Curry Bun Recipe when you want a warm, crispy, curry-filled project that feels worth the time. Serve them fresh, share them if you are feeling generous, and tell me how yours turned out — did you go classic, spicy, vegetarian, or something totally your own? Can’t wait to hear what you think.
Japanese Curry Bun Recipe
Ingredients
Curry Filling
- ½ yellow onion chopped
- ½ thumb-sized piece ginger grated
- 2 garlic cloves grated
- 1 medium potato cubed
- 1 carrot cubed
- ½ cup water
- 7 oz minced turkey 200 g
- 1 tbsp ketchup
- 1 tbsp soy sauce
- ½ apple grated just before using
Curry Slurry
- 2 tbsp curry powder
- 1 tbsp cornstarch
- ¼ cup water 60 ml
Bun Dough
- 3 cups bread flour 390 g
- 1 tsp salt
- 2 tbsp honey 40 g
- 2 tsp instant yeast 6 g
- 1 cup warm milk 250 ml
- 2 tbsp softened butter 30 g, cut into small pieces
Breading
- 2 large eggs
- 1 ½ cups panko breadcrumbs 70 g
For Frying
- Oil as needed for deep frying
Instructions
Prepare the Curry Filling
Prepare the curry slurry.
- In a small bowl, combine the curry powder, cornstarch, and water. Mix until smooth, then set aside.
Cook the aromatics.
- Heat a small amount of oil in a pan over medium heat. Add the chopped onion and cook until translucent. Add the grated ginger and garlic, then continue cooking until lightly golden and fragrant.
Cook the vegetables.
- Add the cubed potato, cubed carrot, water, and a small amount of salt. Cover the pan with a lid and cook until the potato and carrot are tender and fully cooked.
Reduce excess liquid.
- Once the vegetables are cooked, check the pan for remaining liquid. If liquid remains, continue cooking uncovered until the mixture is dry. The filling should not be saucy.
Add the turkey.
- Add the minced turkey and a small amount of salt. Cook until the turkey is fully cooked, breaking it into small pieces as it cooks.
Season the filling.
- Add the ketchup, soy sauce, and freshly grated apple. Stir until evenly combined.
Thicken the filling.
- Add the prepared curry slurry to the pan. Stir well and continue cooking until the curry mixture thickens and becomes scoopable.
Cool the filling.
- Remove the filling from the heat and allow it to cool completely before assembling the buns.
Prepare the Bun Dough
Combine the dough ingredients.
- In the bowl of a stand mixer, combine the bread flour, salt, honey, instant yeast, and warm milk. Mix until the ingredients are incorporated.
Knead the dough.
- Knead the dough for 10 minutes using the dough hook attachment.
Add the butter.
- Reduce the mixer speed and add the softened butter one piece at a time, allowing each addition to incorporate before adding the next.
Continue kneading.
- Increase to normal speed and knead for an additional 5 minutes, or until the dough is smooth and elastic.
First rise.
- Shape the dough into a ball and place it in a greased bowl. Cover tightly with cling film and allow the dough to rise until doubled in size.
Assemble the Curry Buns
Prepare the breading station.
- Whisk the eggs in a shallow plate. Place the panko breadcrumbs in a separate shallow plate.
Divide the dough.
- Transfer the risen dough to a work surface and gently shape it into a log. Cut the dough into 16 equal pieces.
Shape the dough pieces.
- Form each piece into a ball. Cover the dough balls with cling film to prevent drying.
Roll the dough.
- Take one dough ball and flatten it slightly. Roll it into a circle approximately 3.5 inches, or 9 cm, wide. Roll the outer edges slightly thinner than the center to make sealing easier.
Add the filling.
- Place a portion of the cooled curry filling in the center of the dough circle.
Seal the bun.
- Lightly moisten the edges of the dough with water. Fold the dough over the filling and pinch the seams tightly to seal. Pinch and fold the seam again to secure the filling completely.
Coat the bun.
- Dip the sealed bun into the whisked eggs, coating it evenly. Transfer it to the panko breadcrumbs and coat all sides thoroughly.
Repeat.
- Place the breaded bun on a parchment-lined baking tray. Repeat the process with the remaining dough and filling.
Second rest.
- Cover the breaded buns with cling film and allow them to rest for 30 minutes, or until slightly puffed.
Fry the Curry Buns
Heat the oil.
- Heat a generous amount of oil in a pot over medium-low heat.
Fry the buns.
- Carefully place one or more buns into the hot oil, depending on the size of the pot. Roll each bun gently in the oil immediately after adding it to promote even cooking.
Cook until golden.
- Fry for approximately 5 minutes, or until the buns are golden brown and fully cooked.
Drain the buns.
- Remove the buns from the oil and place them on kitchen paper to absorb excess oil.
Serve.
- Serve the Japanese curry buns fresh and warm for the best texture and flavor.
Notes
Use gluten-free panko breadcrumbs or crushed gluten-free breadcrumbs for coating.
Replace the soy sauce with gluten-free tamari or certified gluten-free soy sauce.
Confirm that the curry powder, cornstarch, ketchup, instant yeast, and other packaged ingredients are labeled gluten-free.
Prepare the buns on clean, gluten-free surfaces and fry them in fresh oil that has not been used for gluten-containing foods.