All-purpose flour, unsalted butter, heavy whipping cream, decorating sugar, powdered sugar, vanilla extract, and food color.
I’ve always thought Cream Wafers feel like the kind of cookie that shows up when someone wants the dessert table to look a little extra special. They’re delicate, sparkly, buttery, and filled with a sweet creamy center that makes them look like they came from an old family recipe box. You know the kind of cookie I mean, right? The one sitting on a pretty plate at Christmas, Easter, a shower, or a tea party, quietly looking fancy while everyone reaches for “just one.” Then another. Then maybe one more because they’re tiny and tiny cookies barely count. At least that’s what I tell myself.
These Cream Wafers remind me of the kind of baking that feels a little nostalgic. Not flashy. Not over-the-top. Just soft colors, tender cookies, and that sweet little butter filling tucked between two delicate wafers. I can almost picture them on a holiday tray beside spritz cookies and shortbread, with someone’s aunt saying, “Careful, they’re delicate,” right before half the plate disappears. There’s something sweet about cookies like that. They don’t need a dramatic frosting swirl or chocolate drizzle to feel special. They’re pretty in a quiet way.
The first time I made cream wafer cookies, I’ll be honest, I was a bit suspicious of the dough. It’s just flour, butter, and heavy cream, which almost feels too simple. No egg, no sugar in the dough itself, nothing loud. But once the wafers are rolled thin, dipped in decorating sugar, baked until pale and tender, and filled with that smooth sweet cream? It makes sense. The cookie is buttery and light, the sugar adds sparkle and crunch, and the filling brings the sweetness. It’s a tiny sandwich cookie with a very good personality.
What I love most about Cream Wafers is how customizable they are without being complicated. You can make the filling vanilla, lemon, peppermint, or even almond if you like. You can tint it pastel pink for Valentine’s Day, soft green for Christmas, yellow for spring, or leave it plain and classic. You can cut the wafers into circles, hearts, stars, flowers, or whatever little cookie cutter makes you smile. They’re charming, a little old-fashioned, and honestly kind of fun to make once you stop trying to make every single one perfect. Homemade cookies are allowed to look homemade. That’s part of the whole point.

Why you’ll Love these Cream Wafers?
The biggest reason these Cream Wafers stand out is their texture. They’re not thick, chewy cookies, and they’re not hard, crunchy ones either. They’re tender, buttery, and almost flaky because the dough is made with softened butter and heavy whipping cream. The wafers bake up pale and delicate, then the creamy filling adds sweetness and richness. It’s a very different kind of cookie, and that’s what makes them memorable.
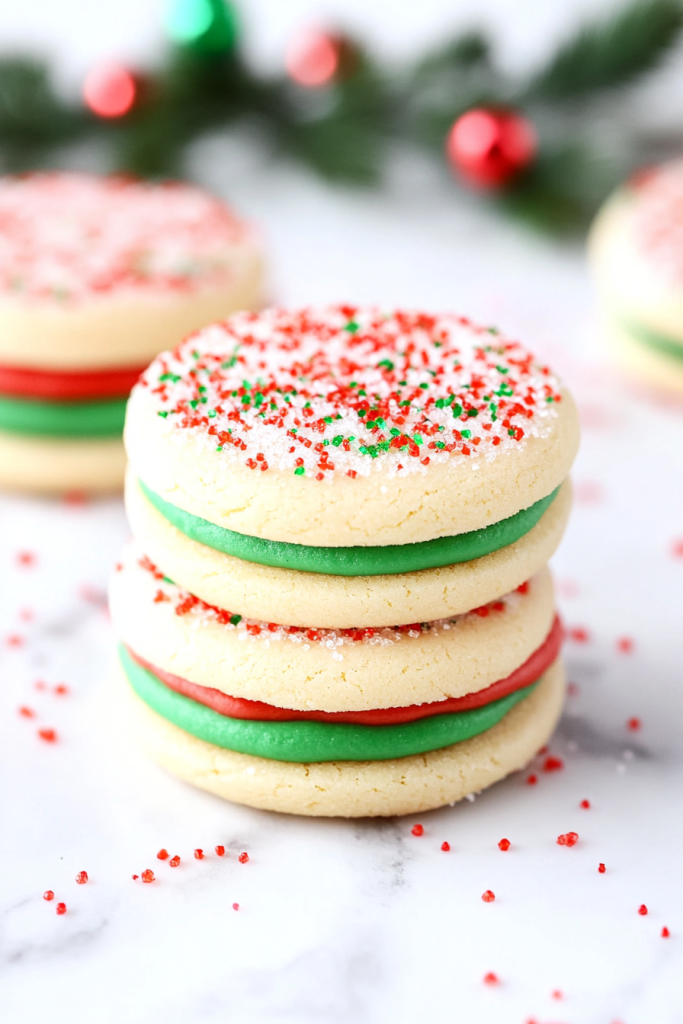
Another thing I really like about these cream-filled wafer cookies is how pretty they look with such simple steps. The decorating sugar gives each wafer a sparkly finish before the cookies are even filled. Then once you add a little tinted cream in the middle, they suddenly look polished and festive. No complicated decorating. No piping flowers until your hand cramps. Just cut, sugar, bake, fill, and sandwich. A cookie that looks fancier than the effort involved? Yes, please.
These Cream Wafers are also perfect for holidays and special gatherings because the filling can match the occasion. Vanilla feels classic and simple. Lemon makes them bright and springy. Peppermint gives them that cool holiday-cookie feeling. A little food color changes the whole mood. Same cookie, different personality. I love that kind of flexibility, especially when I’m trying to make a dessert tray look pretty without baking six different recipes.
They’re also wonderfully bite-sized. That may not sound like a big deal, but tiny sandwich cookies are great for parties because people can take one without committing to a huge dessert. Of course, tiny also means they tend to vanish quickly. You set out a plate, turn around, and somehow there are only crumbs and one slightly lonely cookie left. Sound familiar? That’s usually a good sign.

Ingredient Notes
Before making these Cream Wafers, let’s talk about the ingredients because this recipe is simple, and simple recipes really depend on each part doing its job. The wafer dough is made with flour, butter, and heavy cream, while the filling is made with powdered sugar, butter, extract, and optional food color. Nothing complicated, but the texture depends on softened butter, chilled dough, and a light touch.
- All-purpose flour: Flour gives the wafer dough enough structure to roll and cut into shapes. Since this dough is rich with butter and cream, the flour helps hold everything together without making the cookies heavy. Try to measure carefully. Too much flour can make the wafers dry, and too little can make the dough sticky and difficult to handle.
- Unsalted butter: Butter is used in both the wafer dough and the filling, so it really matters here. In the dough, softened butter helps create that tender, delicate texture. In the filling, it gives the cream a smooth, rich body. Make sure the butter is softened, not melted. Melted butter can make the dough too loose and the filling too soft. Butter has moods, apparently.
- Heavy whipping cream: Heavy cream is what makes the wafer dough feel so special. It adds richness and helps the cookies bake up tender and light. This is one reason Cream Wafers taste different from regular sugar cookies. The dough may look plain, but the cream gives it that delicate, melt-in-your-mouth feel.
- Decorating sugar: Decorating sugar coats the cutouts before baking. It adds a pretty sparkle and a light sweet crunch to the wafers. Since the dough itself is not very sweet, the sugar coating is important. It makes the cookies look festive and gives them just enough sweetness on the outside.
- Powdered sugar: Powdered sugar sweetens the filling and helps it blend smoothly with the butter. It gives the filling that soft, creamy texture that spreads or pipes easily between the wafers. Granulated sugar would be gritty here, so powdered sugar is the way to go.
- Flavor extract: You can use vanilla, lemon, peppermint, or even almond extract depending on the flavor you want. Vanilla is classic and soft. Lemon is bright and fresh. Peppermint feels festive and wintery. Just be careful with stronger extracts, especially peppermint and almond, because a little can go a long way.
- Food color: Food color is optional, but it makes these cream wafer sandwich cookies so pretty. Soft pastel colors look especially sweet between the pale wafers. You only need a little. The goal is a pretty tint, not filling that looks like it belongs in a neon sign.

How to Make Cream Wafers?
Making Cream Wafers is easiest when you break the recipe into small steps. First, you mix and chill the dough. Then you roll it thin, cut it into small shapes, coat each piece with decorating sugar, prick the tops, and bake until set but still pale. Once the wafers cool, you make the filling and sandwich them together. None of it is hard, but the dough does need to stay cold. That’s the tiny secret here.
Step 1: Make the Wafer Dough
In a medium bowl, mix the all-purpose flour, softened butter, and heavy whipping cream until a dough forms.
The dough should come together into a soft, rich mixture. It may seem plain at first, but don’t worry. This buttery cream dough is what gives the wafers their tender texture. Make sure the butter is evenly worked into the flour and cream so the dough rolls smoothly later.
Step 2: Divide and Chill the Dough
Divide the dough into three equal portions.
Wrap each portion in plastic wrap and refrigerate for about 1 hour, or until firm. This step is important because the dough has a lot of butter. If it gets too warm, it can become soft, sticky, and slightly dramatic. Chilling makes it easier to roll, cut, and transfer.
Step 3: Prepare the Oven and Baking Sheets
Heat the oven to 375°F.
Line two baking sheets with parchment paper. This helps prevent sticking and makes cleanup easier. And after rolling out tiny cookies, nobody wants to fight baked dough off a pan. Absolutely not.
Step 4: Roll the Dough
Work with one-third of the dough at a time.
Keep the remaining dough in the refrigerator until you are ready to use it. On a lightly floured surface, roll the dough to about ⅛ inch thick. Roll gently and evenly. If the dough starts to soften too much, place it back in the refrigerator for a few minutes. Don’t wrestle with warm dough. It usually wins.
Step 5: Cut the Wafers
Use 1½-inch cookie cutters to cut the dough into your desired shapes.
Small circles are classic, but hearts, stars, flowers, and scalloped shapes are all lovely. Try to keep the cookies similar in size so they match up easily when you sandwich them later. They don’t have to be perfect twins. Close cousins are fine.
Step 6: Coat with Decorating Sugar
Generously cover a large piece of waxed paper with decorating sugar.
Transfer the cutouts to the sugar and turn each one to coat both sides. This gives the wafers a sweet, sparkly coating and helps them look extra pretty once baked. It’s a simple step, but it makes a big difference in both flavor and appearance.
Step 7: Transfer and Prick the Cookies
Place the sugared cutouts onto the prepared baking sheets.
Prick each cutout with a fork about 4 times. This helps prevent the wafers from puffing too much and gives them that classic cream wafer look. It also adds a tiny bit of texture. Cute and useful — we like that.
Step 8: Bake the Wafers
Bake for 7 to 9 minutes, or until the cookies are set but not brown.
Watch them closely. Cream Wafers should stay pale and delicate. If they brown too much, they can become crisp instead of tender. You want them baked through, but still light in color.
Step 9: Cool Completely
Remove the wafers from the baking sheets and transfer them to a wire rack.
Let them cool completely, about 1 hour, before adding the filling. The cookies need to be fully cool so the butter filling doesn’t melt or slide around. Warm cookies and soft filling sound nice in theory, but in reality? A little messy.
Step 10: Make the Cream Filling
In a mixing bowl, combine the powdered sugar, softened butter, and your chosen extract.
Mix until smooth and creamy. Add food color if desired and mix until evenly tinted. The filling should be thick enough to pipe or spread, but soft enough to sandwich between the cookies without breaking them.
Step 11: Pipe the Filling
Transfer the filling to a disposable decorating bag fitted with a decorating tip.
Pipe a small amount of filling onto the bottom side of half of the cooled wafers. You don’t need a huge amount. Once the top wafer goes on, the filling will spread slightly. Too much filling can squeeze out, which is delicious but not always neat.
Step 12: Assemble the Cream Wafers
Top each filled wafer with a second wafer, bottom side facing the filling.
Press gently to sandwich them together. Be careful, because the wafers are delicate. A light press is enough. Think of it as a tiny cookie handshake, not a wrestling match.
Step 13: Serve
Serve the Cream Wafers once assembled, or chill them briefly if you want the filling to firm up.
They’re buttery, delicate, sweet, and just fancy enough to make any cookie tray look prettier.
Storage Options
These Cream Wafers can be stored in an airtight container in the refrigerator for up to 5 days. Since the filling is made with butter, refrigeration helps it stay firm and fresh. The cookies are delicate, so place them gently in the container and avoid packing them too tightly.
If you need to stack them, place parchment paper or wax paper between layers to prevent sticking. The wafers can soften slightly once filled, which is normal, but the paper helps keep them neat and easier to lift from the container.
For the best texture, let the filled cookies sit at room temperature for about 10 to 15 minutes before serving. This softens the filling just a bit and makes the wafers taste more buttery and tender. You can also freeze the unfilled wafers for up to 2 months. I prefer freezing them unfilled because the texture holds better. Thaw the wafers, then fill them when you’re ready to serve.
Variations & Substitutions
One thing I love about Cream Wafers is that they can change with the season. The wafer dough stays simple and buttery, while the filling can shift depending on the flavor, color, or occasion you want. Same cookie, different outfit. Honestly, very efficient.
- Vanilla filling: Vanilla extract makes the most classic version. It’s sweet, simple, and works for any holiday or gathering. This is the flavor I’d choose when I want the cookies to feel soft and traditional.
- Lemon filling: Lemon extract gives the filling a bright, fresh flavor. A pale yellow tint makes these especially pretty for spring, Easter, showers, or tea parties. Lemon cream wafers feel light and cheerful without being too sharp.
- Peppermint filling: Peppermint extract makes the cookies feel festive and wintery. Use a small amount because peppermint can get strong quickly. Tint the filling pale pink or green for a Christmas cookie tray.
- Colored sugar: Decorating sugar can be changed to match the occasion. Use red and green for Christmas, pink for Valentine’s Day, pastels for Easter, or white sparkle for weddings and showers. It’s such an easy way to make the same cookie feel seasonal.
- Different shapes: Use small cookie cutters in circles, hearts, stars, flowers, or scalloped shapes. Just keep them small and similar in size so the wafers bake evenly and sandwich neatly.
- Almond extract: A tiny splash of almond extract can be used instead of vanilla. It gives the filling a soft almond flavor, but use it lightly. Almond extract has no concept of subtlety if you add too much.
- Festive edges: After assembling, roll the exposed filling edges in sprinkles, sanding sugar, or very finely chopped nuts for extra decoration. This is a cute touch for parties or dessert trays.

What to Serve With Cream Wafers?
Cream Wafers are delicate, buttery, and sweet, so they pair beautifully with simple drinks and light desserts. They’re especially lovely for cookie trays, tea tables, brunch spreads, and holiday dessert boards. Since they’re small, they play well with other treats without feeling too heavy.
- Hot tea: Black tea, vanilla tea, chamomile, or Earl Grey all pair nicely with cream wafers. Tea balances the sweetness and makes the cookies feel extra delicate. Very afternoon-tea, even if you’re just drinking it from your everyday mug.
- Coffee: Coffee works beautifully with the buttery wafers and sweet filling. The slight bitterness balances the powdered sugar filling, which makes the cookies feel less sugary.
- Hot chocolate: Hot chocolate is lovely with these cookies, especially if you use peppermint filling. It makes the whole thing feel cozy and wintery.
- Milk: Cold milk is simple and classic with sandwich cookies. It works especially well with vanilla-filled Cream Wafers and makes them feel a little nostalgic.
- Fresh berries: Strawberries, raspberries, or blueberries add freshness and a bright contrast to the buttery cookies. They also make the serving plate look prettier with barely any effort.
- Fruit salad: A light fruit salad pairs well with cream wafers for brunch, showers, spring gatherings, or tea parties. It keeps the dessert table fresh and colorful.
- Cookie trays: Serve them with sugar cookies, shortbread, spritz cookies, thumbprints, chocolate-dipped cookies, or cut-out cookies. Cream wafers add that delicate, sparkly, old-fashioned touch to a tray.
FAQ
Why should Cream Wafers not brown?
Cream wafers should stay pale and delicate. If they brown too much, they can become too crisp and lose that tender, buttery texture.
Can I use different extracts in the filling?
Yes, vanilla, lemon, peppermint, or almond extract can be used. Adjust the amount depending on how strong the extract is.
Can I spread the filling instead of piping it?
Yes, absolutely. If you don’t have a decorating bag, use a small knife or offset spatula to spread the filling onto the wafers.
How do I keep the cookies from getting too soft?
If making them ahead, store the unfilled wafers separately and fill them closer to serving. Once filled, refrigerate them and enjoy within a few days.
These Cream Wafers are delicate, buttery, sparkly, and filled with smooth sweet cream. They look fancy, but they’re made with simple ingredients and just a little patience. That’s my favorite kind of cookie — pretty without being stressful.
I love how old-fashioned they feel, in the best way. They’re the kind of cookies that make a dessert tray look thoughtful, whether you’re making them for Christmas, Easter, a shower, a tea party, or just because you wanted something dainty and sweet. Sometimes that’s reason enough.
So tell me — would you keep these Cream Wafers classic with vanilla filling, or would you try lemon, peppermint, almond, or a pretty pastel color? I’d love to know how you’d make them your own.

Cream Wafers
Ingredients
For the Wafers
- 2 c all-purpose flour
- 1 c unsalted butter softened
- ⅓ c heavy whipping cream
- Decorating sugar as needed
For the Creamy Filling
- ¾ c powdered sugar
- ¼ c unsalted butter softened
- 1 tsp vanilla extract, lemon extract, or peppermint extract
- Food color optional
Instructions
Step 1: Prepare the Wafer Dough
- In a medium mixing bowl, combine the all-purpose flour, softened butter, and heavy whipping cream.
- Mix until a soft dough forms.
Step 2: Chill the Dough
- Divide the dough into three equal portions.
- Wrap each portion in plastic wrap.
- Refrigerate for approximately 1 hour, or until firm.
Step 3: Prepare the Oven and Baking Sheets
- Preheat the oven to 375°F.
- Line two baking sheets with parchment paper.
Step 4: Roll the Dough
- Remove one portion of dough from the refrigerator.
- Keep the remaining portions refrigerated until ready to use.
- On a lightly floured surface, roll the dough to ⅛-inch thickness.
Step 5: Cut the Wafers
- Cut the rolled dough into desired shapes using 1½-inch cookie cutters.
- Repeat with the remaining chilled dough portions.
Step 6: Coat with Decorating Sugar
- Generously cover a large piece of waxed paper with decorating sugar.
- Place each cutout onto the sugar and turn to coat both sides evenly.
Step 7: Prepare for Baking
- Transfer the sugared cutouts to the prepared baking sheets.
- Prick each cutout with a fork approximately 4 times.
Step 8: Bake
- Bake for 7 to 9 minutes, or until the wafers are set but not browned.
Step 9: Cool
- Remove the wafers from the baking sheets.
- Transfer them to a wire rack.
- Allow them to cool completely, approximately 1 hour.
Step 10: Prepare the Creamy Filling
- In a mixing bowl, combine the powdered sugar, softened butter, and chosen extract.
- Mix until smooth and creamy.
- Add food color, if desired, and mix until evenly tinted.
Step 11: Fill the Wafers
- Transfer the filling to a disposable decorating bag fitted with a decorating tip.
- Pipe a small amount of filling onto the bottom side of half of the cooled wafers.
Step 12: Assemble
- Top each filled wafer with a second wafer, placing the bottom side against the filling.
- Press gently to form sandwich cookies.
Step 13: Serve
- Serve immediately, or refrigerate briefly before serving if a firmer filling is preferred.
Notes