Pie crusts, blackberries, raspberries, sugar, lemon juice, cornstarch, milk, coarse sugar.
There’s something about a homemade Black Raspberry Pie Recipe that makes me feel like summer has wandered into the kitchen and decided to stay awhile. You know that smell when berries start bubbling in the oven? Sweet, tart, buttery, a little wild. It always reminds me of those warm afternoons when dessert wasn’t fancy, but it still felt special because someone took the time to make it.
The first time I made a pie like this, I’ll be honest, I was way too impatient. I saw the golden crust, the berry filling bubbling through the little slits on top, and I thought, Oh, we’re ready. Big mistake. Huge. I sliced it too early, and the filling ran across the plate like a tiny purple river. Still delicious, yes, but definitely not the pretty slice I had imagined. So now, whenever I make this Black Raspberry Pie Recipe, I remind myself that pie needs time. A little cooling. A little chilling. A little self-control, unfortunately.
What I love about this pie is that it feels old-fashioned in the best way. It’s made with blackberries and raspberries, so the flavor is deep, juicy, and sweet-tart. It’s not one of those desserts that only tastes sugary. The lemon juice keeps it bright, the cornstarch helps the filling settle, and the double crust gives you that cozy, flaky bite. It’s the kind of black raspberry pie that feels right at home on a summer table, next to iced tea, paper napkins, and someone saying they’re “too full” before asking for a sliver anyway. Sound familiar?
This recipe uses prepared pie crusts, and honestly, I’m not mad about it. I love a homemade crust when I have the energy, but some days? Some days I want berry pie without turning my counter into a flour-covered disaster zone. Prepared crust keeps this berry pie recipe simple and doable, especially when the filling already brings so much flavor. And that’s the nice thing here: it still tastes homemade because the filling is made with real berries, sugar, lemon juice, and a little patience.
I also like that this Black Raspberry Pie Recipe works with fresh or frozen berries. That makes it feel less precious. You don’t have to wait for the perfect farmers market basket or panic because the berry season passed too fast. Frozen blackberries and raspberries still make a gorgeous filling once they simmer with sugar and thicken up with lemon juice and cornstarch. It’s practical, and I appreciate practical. Especially when pie is involved.
Why you’ll Love this Black Raspberry Pie Recipe?
You’ll love this Black Raspberry Pie Recipe because it has that classic summer dessert feeling without being overly complicated. The filling is juicy and glossy, the crust turns golden, and the flavor lands right in that sweet-tart spot that makes berry desserts so good. The blackberries bring a darker, richer flavor, while the raspberries add brightness and a little tang. Together, they make a pie that tastes like it belongs at a cookout, a family dinner, or honestly, eaten quietly from the fridge at 10 p.m. No judgment.
One of my favorite things about this black raspberry pie is the filling method. Instead of tossing raw berries straight into the crust and hoping for the best, you cook the berries with sugar first. They release their juices, soften, and turn beautifully glossy. Then you stir in the lemon juice and cornstarch slurry, which helps the filling thicken before it even gets baked. It’s a small extra step, but it makes the pie feel more reliable. And berry pies can be a little dramatic, so I’ll take all the help I can get.
This Black Raspberry Pie Recipe also has a wonderful texture contrast. The top crust gets brushed with milk and sprinkled with coarse sugar, so it bakes up golden, shiny, and lightly crunchy. Then underneath, you have that soft, jammy berry filling. It’s rustic but still pretty. Not perfect-perfect, because homemade pies rarely are, but that’s kind of the charm. A little berry bubbling through the crust? Cute. A purple drip on the edge? Also cute. Pie has character.
Another reason I like this raspberry blackberry pie is that the sweetness can be adjusted. Berries can be unpredictable. Some are sweet and sunny. Some are tart enough to make you blink twice. With this recipe, you taste the filling after the sugar dissolves and add more sugar one tablespoon at a time if needed. I like that because it gives you control without making the recipe feel fussy.
And because this pie needs to chill, it’s actually a great make-ahead dessert. I know waiting for pie feels slightly unfair, but the chill time helps the filling set so you can get clean slices. Bake it earlier in the day or the night before, let it cool, chill it well, and then bring it out when you’re ready. Future-you will feel very organized. Maybe even a little smug. Deserved.
Ingredient Notes
The ingredients in this Black Raspberry Pie Recipe are simple, but they each have a real job. The berries bring the flavor, the sugar balances the tartness, the lemon juice adds brightness, the cornstarch thickens all those juicy berry juices, and the crust holds everything together. The milk and coarse sugar on top are small touches, but they make the pie look extra inviting. Like it tried a little harder for company.
- Prepared pie crusts: You’ll need 2 prepared pie crusts, one for the bottom and one for the top. This makes the Black Raspberry Pie Recipe much easier, especially if you want a homemade-style dessert without making pastry from scratch. Homemade crust is lovely, yes, but prepared crust is also a friend. Let the crusts soften just enough to handle, but keep them cool so they bake up better.
- Blackberries: Blackberries give this black raspberry pie a deep, rich berry flavor and that dark, dramatic color. Fresh blackberries are wonderful when they’re in season, but frozen blackberries work too. If you use frozen berries, they may release more juice, so don’t rush the thickening step.
- Raspberries: Raspberries bring brightness, tartness, and a softer texture to the filling. They break down a little as they cook, which helps make the filling glossy and jammy. The mix of raspberries and blackberries gives this berry pie recipe a lovely sweet-tart balance.
- Sugar: Sugar sweetens the filling and helps the berries release their juices. This recipe starts with 1 cup of sugar, but you can adjust it depending on how sweet or tart your berries are. Taste the mixture after it cooks for a few minutes, then add more sugar 1 tablespoon at a time if needed. Easy does it.
- Lemon juice: Lemon juice makes the berry flavor pop. It keeps the filling from tasting too heavy or too sweet. It also mixes with the cornstarch to make a smooth slurry, which helps thicken the filling without lumps. Tiny kitchen science, but nothing scary.
- Cornstarch: Cornstarch helps thicken the berry juices so the pie sets properly after baking and chilling. Without it, the filling may be too runny. Mix it with lemon juice first so it blends smoothly into the hot berries. Nobody wants surprise cornstarch lumps in their pie. Nobody.
- Milk: Milk is brushed over the top crust before baking. It helps the crust brown and gives it a nice finish. You only need 1 tablespoon, so don’t soak the crust. Just a light brush is enough.
- Coarse sugar: Coarse sugar adds sparkle, sweetness, and a little crunch to the top crust. It’s simple, but it makes the finished pie look bakery-pretty. Pie glitter, basically. The edible kind, thankfully.
How to Make Black Raspberry Pie Recipe?
Making this Black Raspberry Pie Recipe is not hard, but there are a few steps that really matter. You’ll prepare the crust, cook the berries with sugar, thicken the filling with lemon juice and cornstarch, let it cool slightly, assemble the pie, bake it until golden and bubbling, then cool and chill it before serving. That last part is the test of character. I wish pie didn’t require patience, but here we are.
Step 1: Preheat the Oven and Prepare the Baking Pan
Preheat your oven to 400°F / 204°C. Line a baking pan with aluminum foil so cleanup is easier. Berry pies like to bubble over, and baked-on berry juice is basically fruit glue. Delicious fruit glue, but still. Placing the pie on a lined baking sheet will catch any drips and save your oven from a sticky purple situation.
Step 2: Prepare the Bottom Crust
Sprinkle a little flour on the pie plate, then gently place the bottom crust into it. Press it into the plate without stretching it too much. Trim away any extra crust around the edges if needed. The goal is to give the filling a good, even base. It doesn’t need to look perfect. It just needs to hold all that berry goodness.
Step 3: Cook the Berries and Sugar
Add the blackberries, raspberries, and sugar to a large saucepan over medium heat. Stir for about 5 minutes, or until the sugar dissolves and the berries release their juices. The mixture will turn glossy, dark, and beautifully fragrant. This is the moment when the kitchen starts smelling like summer jam, and you may feel tempted to stop and spoon it over ice cream. Understandable.
Step 4: Taste and Adjust the Sweetness
Once the sugar has dissolved, taste the berry mixture carefully. If it tastes too tart, add more sugar 1 tablespoon at a time. I wouldn’t dump in a bunch all at once because berries can change quickly from nicely sweet-tart to too sweet. You want the filling balanced, with enough tartness to keep it lively.
Step 5: Make the Cornstarch Slurry
In a small bowl, mix the cornstarch and lemon juice until smooth. This creates a slurry, which is just a simple mixture that helps the cornstarch blend into the hot berries without clumping. It sounds more technical than it is. Basically, you’re giving the cornstarch a smooth entrance instead of letting it show up awkwardly.
Step 6: Thicken the Berry Filling
Slowly pour the lemon-cornstarch mixture into the simmering berries while stirring constantly. Keep cooking and stirring for 2 to 3 minutes, or until the filling thickens slightly. It won’t look fully set yet, and that’s okay. It will continue to thicken in the oven and firm up more as it chills. Trust the process, but also don’t skip the chilling later. Berry pie remembers.
Step 7: Let the Filling Cool Slightly
Remove the saucepan from the heat and let the filling cool for about 10 minutes. This helps protect the bottom crust from getting soggy right away. It also makes the filling easier to handle. Ten minutes is just enough time to tidy up a little, or stand there admiring the filling like a normal pie person.
Step 8: Fill the Pie Crust
Pour the slightly cooled berry filling into the prepared bottom crust. Spread it evenly so the berries are distributed through the pie. The filling should look dark, glossy, and jammy. This is also the point where you may question whether you made enough filling. You did. It just smells so good your brain wants more.
Step 9: Add the Top Crust
Place the second pie crust over the filling. Seal the edges by crimping them with a fork or your fingers. If the crimping looks rustic, that’s fine. Honestly, rustic is just homemade with confidence. The important thing is sealing the edges so the filling stays mostly inside the pie.
Step 10: Cut Steam Slits
Cut small slits in the top crust to let steam escape while the pie bakes. This helps the crust bake properly and gives the filling room to bubble. Those little berry bubbles peeking through the crust are a good sign. They mean the filling is hot enough and doing what it should.
Step 11: Brush and Sprinkle the Crust
Brush the top crust with 1 tablespoon of milk, then sprinkle it with 2 tablespoons of coarse sugar. The milk helps the crust brown, and the coarse sugar adds crunch and sparkle. It’s a tiny step, but it makes the pie look so pretty. Like it got dressed for a summer picnic.
Step 12: Bake the Pie
Place the pie on the foil-lined baking sheet and bake at 400°F / 204°C for 40 to 45 minutes. The pie is ready when the crust is golden brown and the filling bubbles through the slits. If the crust edges brown too quickly, cover them with foil strips or a pie crust shield halfway through baking. This keeps the edges from getting too dark while the center finishes.
Step 13: Cool at Room Temperature
After baking, move the pie to a cooling rack and let it cool for about 2 hours at room temperature. I know this is hard. It looks ready. It smells ready. But the filling needs time to calm down and start setting. Think of it as letting the pie take a deep breath.
Step 14: Chill Before Serving
Transfer the pie to the refrigerator and chill it thoroughly before slicing. The recipe calls for about 3 hours of chill time, and it really does matter. If you skip this step, the filling will be very runny. Still delicious, yes, but more like berry sauce in a crust than a neat slice of Black Raspberry Pie Recipe. If clean slices matter to you, chill it. If you’re eating it in pajamas straight from the pan, well… carry on.
Storage Options
This Black Raspberry Pie Recipe stores well, especially because the filling already needs time to chill and set. Once the pie is cooled, keep it covered in the refrigerator. The crust may soften a little after a day or two, but the berry flavor stays rich and lovely. Sometimes I think berry pie tastes even better the next day, when everything has settled into itself.
- Refrigerator: Store the cooled black raspberry pie in the refrigerator, loosely covered with foil or plastic wrap, for up to 4 days. The filling should stay nicely set, and the flavor may deepen a bit after the first day. The crust may not be quite as crisp, but it will still taste wonderful.
- Room temperature: You can leave the pie out while serving, but don’t let it sit at room temperature for too long. Because it has a juicy fruit filling, refrigerate leftovers within 2 hours. Pie is cozy, but food safety is still the boss.
- Freezer: You can freeze baked Black Raspberry Pie Recipe for up to 2 months. Let it cool completely, then wrap it tightly in plastic wrap and foil. Thaw it in the refrigerator overnight before serving. The crust may be softer after thawing, but the filling will still taste delicious.
- Freezing slices: Individual slices freeze nicely too. Wrap each slice tightly and place them in a freezer-safe container. This is a lovely little gift to your future self, especially on a random weekday when dessert feels necessary.
- Reheating: If you prefer warm pie, reheat slices in a 300°F oven until gently warmed. Just remember that warm berry pie will be softer and messier than chilled pie. Not bad messy. Just “grab a spoon” messy.
Variations & Substitutions
This Black Raspberry Pie Recipe is flexible, especially with the berries. You can use fresh fruit, frozen fruit, true black raspberries, blueberries, a lattice crust, or even a crumble topping. Berry pies don’t have to be stiff and serious. They’re more like summer in dessert form, and summer usually doesn’t follow rules perfectly either.
- Use fresh berries: Fresh blackberries and raspberries are beautiful when they’re in season. They give the pie a bright flavor and may release a little less liquid than frozen berries. If you find sweet, ripe berries at the market, this berry pie recipe is a lovely way to use them.
- Use frozen berries: Frozen berries are practical and work very well in this Black Raspberry Pie Recipe. They may release more juice as they cook, so make sure to thicken the filling properly. If they’re very icy, you can let them thaw slightly and drain off extra liquid.
- Use true black raspberries: If you have actual black raspberries, use them in place of some or all of the blackberries and raspberries. They have a deep, almost wine-like berry flavor and make a stunning pie. They can be harder to find, but if you have them, lucky you.
- Add blueberries: Replace part of the berries with blueberries for a mixed berry pie. Blueberries add sweetness and a slightly different texture. It becomes less of a strict black raspberry pie, but still very delicious.
- Add cinnamon: A small pinch of cinnamon adds warmth to the filling. Don’t use too much, though. You want it to support the berries, not take over like an overexcited guest.
- Add vanilla: A splash of vanilla extract can soften the tartness and make the filling taste rounder. It’s optional, but I like it when I want the pie to feel a little softer and more dessert-y.
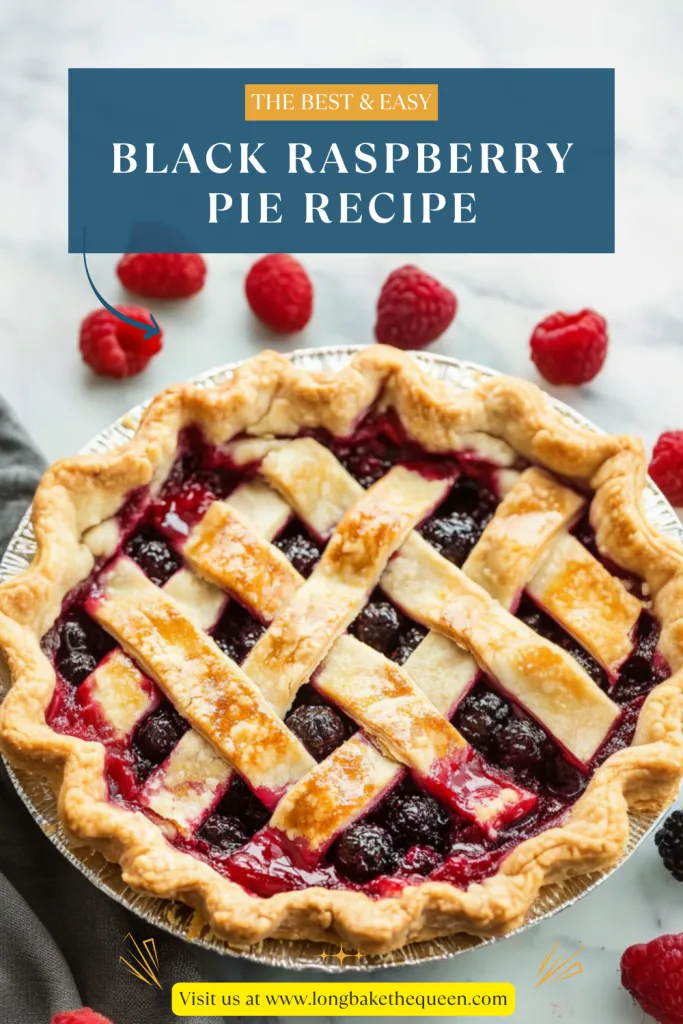
- Use a lattice crust: A lattice top looks beautiful and lets the dark berry filling peek through. It also helps steam escape naturally. It takes a little more effort, but it’s worth it if you’re going for that picture-perfect summer pie look.
- Make a crumble topping: Skip the top crust and use a crumble topping made with flour, sugar, butter, and oats. It turns the pie into a rustic berry crumble pie. Different texture, same cozy berry vibe.
- Adjust the sugar: If your berries are very sweet, you can use a little less sugar. If they’re tart, add more. Taste the cooked filling before assembling the pie so you can adjust it while you still can.
- Use tapioca starch: Tapioca starch can be used instead of cornstarch if you prefer. It gives fruit pies a glossy texture and works well with berry fillings. Just make sure to use the right amount for your thickener.
What to Serve With Black Raspberry Pie Recipe?
This Black Raspberry Pie Recipe is sweet, tart, juicy, and buttery, so it pairs beautifully with creamy toppings and simple drinks. You can serve it chilled for clean slices or slightly warm for a softer, messier dessert. Both are good. It just depends on your pie mood, and yes, pie mood is absolutely a real thing.
- Vanilla ice cream: Vanilla ice cream is the classic pairing for black raspberry pie. The cold creaminess melts into the berry filling and balances the tart fruit. It’s simple, nostalgic, and pretty much impossible to argue with.
- Whipped cream: Lightly sweetened whipped cream adds softness without covering up the berries. It’s especially nice if the pie is chilled. A generous dollop makes everything feel a little more special.
- Greek yogurt: Plain or vanilla Greek yogurt gives a tangy contrast to the sweet berry filling. It’s a lighter option and works surprisingly well, especially for a daytime slice. Pie for brunch? I mean… maybe.
- Lemon whipped cream: Add a little lemon zest to whipped cream for a bright topping that matches the lemon juice in the filling. It makes the whole dessert taste extra fresh and summery.
- Coffee: Coffee pairs nicely with this Black Raspberry Pie Recipe because the slight bitterness balances the sweet-tart filling. It’s great after dinner or with an afternoon slice when you need a little treat.
- Iced tea: Iced tea is perfect with berry pie, especially on a warm day. Lemon tea, black tea, or lightly sweetened tea all work well. Very porch-swing energy, even if you do not own a porch.
- Hot tea: Earl Grey, black tea, or berry herbal tea all pair beautifully with the fruit filling. Tea makes pie feel cozy, even when the pie itself tastes like summer.
- Custard sauce: A light vanilla custard sauce turns this pie into a more elegant dessert. It adds richness and makes each slice feel a little fancy without much extra effort.
- Fresh berries: Serve extra raspberries or blackberries on the side for freshness and color. It also makes the plate look pretty, which is always nice when dessert is already doing most of the work.
- Powdered sugar: A light dusting of powdered sugar over the top crust can make the pie look simple and lovely. It’s optional, but it gives a soft bakery-style finish.
FAQ
Is this pie made with black raspberries?
This recipe uses blackberries and raspberries to create a dark, sweet-tart berry filling. If you have true black raspberries, you can use them in place of some or all of the berries. The flavor will be deeper and a little more unique.
Why is my berry pie runny?
Berry pie can turn runny if the filling was not thickened enough, if the pie did not bake until bubbling, or if it was sliced before chilling. This Black Raspberry Pie Recipe needs both cooling and refrigerator time so the filling can set properly.
Do I really need to chill the pie before serving?
Yes, especially if you want clean slices. If you skip the chill time, the filling will likely be very runny. It will still taste good, but it won’t look as neat. Sometimes delicious and pretty are two different goals.
How do I keep the bottom crust from getting soggy?
Let the berry filling cool for about 10 minutes before pouring it into the bottom crust. Also, make sure the filling has thickened slightly before assembling the pie. Baking the pie until the filling bubbles through the slits also helps the filling set correctly.
This Black Raspberry Pie Recipe is juicy, sweet-tart, summery, and full of deep berry flavor. It has blackberries, raspberries, sugar, lemon juice, cornstarch, and a golden double crust that makes the whole thing feel homemade and comforting. It’s not a fussy pie, but it does ask for patience. Bake it, let it cool, chill it well, and then slice into that glossy berry filling like you absolutely earned it.
So if you’re craving a classic berry dessert that tastes like summer and feels cozy enough for a family table, try this Black Raspberry Pie Recipe. Serve it with vanilla ice cream, whipped cream, coffee, or just a fork and zero shame. Can’t wait to hear what you think!
Black Raspberry Pie Recipe
Ingredients
- 2 prepared pie crusts 1 bottom crust and 1 top crust
- 3 1/2 cups blackberries fresh or frozen
- 3 1/2 cups raspberries fresh or frozen
- 1 cup sugar plus more if needed, according to taste
- 2 1/2 tbsp lemon juice
- 2 tbsp cornstarch
For Topping the Crust
- 1 tbsp milk
- 2 tbsp coarse sugar
Instructions
- Preheat the oven to 400°F / 204°C.
- Line a baking pan with aluminum foil to catch any filling that may bubble over during baking.
- Lightly sprinkle flour over the pie plate.
- Place the bottom pie crust into the prepared pie plate.
- Gently press the crust into the plate without stretching it.
- Trim any excess crust from the edges, if necessary.
- In a large saucepan, combine the blackberries, raspberries, and sugar.
- Place the saucepan over medium heat.
- Cook the berry mixture for approximately 5 minutes, stirring regularly, until the sugar dissolves and the berries begin to release their juices.
- Taste the berry mixture carefully.
- If additional sweetness is desired, add more sugar 1 tablespoon at a time, stirring after each addition.
- In a separate small bowl, combine the lemon juice and cornstarch.
- Mix until a smooth slurry forms.
- Gradually pour the lemon juice and cornstarch slurry into the simmering berry mixture while stirring continuously.
- Continue cooking and stirring for 2 to 3 minutes, or until the filling thickens slightly.
- Remove the saucepan from the heat.
- Allow the berry filling to cool for approximately 10 minutes before assembling the pie.
- Pour the slightly cooled berry filling into the prepared bottom crust.
- Spread the filling evenly inside the crust.
- Place the top pie crust over the berry filling.
- Seal the edges of the top and bottom crusts together by crimping with a fork or with your fingers.
- Cut several small slits in the top crust to allow steam to escape during baking.
- Brush the top crust evenly with milk.
- Sprinkle the coarse sugar over the brushed crust.
- Place the pie on the prepared foil-lined baking pan.
- Bake at 400°F / 204°C for 40 to 45 minutes, or until the crust is golden brown and the filling bubbles through the slits.
- If the crust edges begin to brown too quickly, cover them with foil strips or a pie crust shield halfway through baking.
- Remove the pie from the oven.
- Place the pie on a cooling rack.
- Allow the pie to cool at room temperature for approximately 2 hours.
- Transfer the pie to the refrigerator.
- Chill thoroughly for approximately 3 hours before serving.
- Slice and serve once the filling has fully set.
Notes