Adai Dosa Recipe made with toor dal, chana dal, urad dal, rice, ginger, green chilies, curry leaves, cumin, and dried red chilies.
I always come back to this Adai Dosa Recipe when I want breakfast to feel like it actually matters. Not in a dramatic life-changing way, although honestly, some mornings a good dosa does feel pretty close. I mean the kind of breakfast that keeps you full, tastes homemade, and makes the kitchen smell so good you stop pretending you’re “just passing through” and start hovering near the stove. Sound familiar? That was exactly how this recipe got me the first time.
The first time I made adai dosa, I was tired of flimsy breakfasts. You know the sort. Toast that disappears in fifteen minutes. Cereals that feel like paperwork. I wanted something crisp, warm, savory, and a little grounding. Something that felt like a proper meal and not a snack wearing a fake mustache. So I soaked the rice and dals, ground the batter with ginger, chilies, cumin, and curry leaves, and waited. Not very gracefully, I’ll admit. There’s something about the smell of fresh batter hitting a hot tawa that makes patience seem deeply overrated. The edges started crisping, the center stayed hearty, and I remember thinking, ohhh… this is the kind of breakfast that has opinions.
What I love about this Adai Dosa Recipe is that it feels deeply practical and deeply comforting at the same time. It’s protein-rich, filling, and honestly kind of bossy in the best way. It does not whisper. It announces itself. It reminds me of those dishes that are a little rustic, a little imperfect, and all the better for it. No delicate posing. No need to be pretty. Just crisp, golden, nourishing goodness that tastes like someone in the kitchen actually cared. And yes, sometimes that someone is just me trying to rescue a weekday. Still counts.

Why you’ll Love this Adai Dosa Recipe?
There are a lot of reasons to love this Adai Dosa Recipe, but the biggest one is probably that it gives you everything at once: flavor, crunch, comfort, and actual staying power. This is not one of those breakfasts where you’re back in the kitchen an hour later staring into the fridge like it owes you an explanation. This is the kind of meal that holds up its end of the bargain. It’s made with lentils and rice, so it’s hearty and wholesome, but it also crisps beautifully on the tawa, which means it still feels exciting to eat. And I do think that matters. “Healthy” and “delicious” should be allowed to sit at the same table without acting awkward.
I also love that this adai dosa recipe doesn’t need fermentation the way a classic dosa batter does. That makes it feel more accessible, and honestly, more forgiving. I respect fermented batters. I admire them. But I don’t always have that kind of emotional organization in me. This one lets you soak, grind, rest, and cook without turning breakfast into a multi-day personal project. That’s a relief, frankly.
And then there’s the flavor. This South Indian Adai Dosa Recipe is not shy. You’ve got ginger, green chilies, dried red chilies, cumin, and curry leaves all coming together in that slightly coarse batter, and every bite has a lovely little kick to it. Not just spicy, but flavorful. Warm. Earthy. Savory. Real. It’s the sort of recipe that tastes like it has history, even if you’re just making it in your own kitchen in slightly mismatched pajamas. Do you agree? Some foods just feel more alive than others. This is one of them.
Ingredient Notes
The ingredient list for this Adai Dosa Recipe is simple, but it’s the kind of simple where every ingredient is actually doing something useful. Nobody’s just there to fill space. I always appreciate that. Especially before coffee.
- Toor dal: This gives the adai body and depth. It’s part of what makes the dosa feel hearty and substantial instead of thin or snacky. It adds that earthy backbone that makes the whole batter feel grounded.
- Chana dal: Chana dal brings a nuttier flavor and helps create that rustic, slightly coarse texture that makes adai dosa feel different from regular dosa. It adds bite, and I really think that bite is part of the charm.
- Urad dal: Urad dal softens the overall texture a bit and helps the batter hold together nicely. Without it, the dosa would still work, probably, but it wouldn’t feel quite as balanced.
- Rice: Rice helps the dosa crisp up on the pan. It gives the batter structure and that lovely dosa-like finish, even though Adai Dosa Recipe is definitely heartier than a classic dosa.
- Curry leaves: Curry leaves are one of those ingredients that make the batter smell instantly more alive. They bring such a beautiful aromatic note, and if you’ve ever caught that scent when the batter hits the hot tawa, you know exactly what I mean.
- Dry red whole chilies: These add deeper, warmer chili flavor. Not just heat. Actual character. That’s important.
- Green chilies: Green chilies bring a brighter, fresher heat. I really like having both kinds of chilies in this adai dosa recipe because it makes the spice feel more layered and less one-note.
- Salt: Salt brings the whole batter into focus. Lentils and rice are lovely, but they absolutely need proper seasoning to taste like themselves.
- Ginger: Ginger adds warmth and freshness and keeps the batter from tasting heavy. It’s one of my favorite ingredients here because it does a lot without trying too hard.
- Cumin seeds: Cumin gives the batter that earthy warmth that works so beautifully with lentils. It’s subtle, but you’d miss it if it weren’t there.
- Water: Water helps with both soaking and grinding. The amount matters. Too little and the batter won’t blend well. Too much and the dosa spreads like it’s had too much freedom.
- Oil or ghee: This is what gives the dosa those crisp edges and helps it release from the pan. Ghee adds a richer flavor, which I personally love, but oil works perfectly well too.
- Optional vegetables or cheese: Yes, I know that’s not the most traditional route, but real kitchens do real things. A little onion, grated carrot, or even cheese can be genuinely delicious if that’s the version you want.
How to Make Adai Dosa Recipe?
Making this Adai Dosa Recipe is actually very straightforward once you understand the rhythm: soak, grind, rest, cook. That’s really it. No mystery. No dramatic reveal. Just a very solid breakfast plan that rewards you with crisp, golden dosa and the feeling that you definitely made the right choice.
Step 1. Wash the rice and lentils
Take a bowl and add the toor dal, chana dal, urad dal, and rice. Wash everything properly and drain off the water. This step seems basic, because it is, but it matters. It helps clean the ingredients and gives the batter a fresher taste. Also, something about rinsing lentils always makes me feel unusually competent, even if the rest of the kitchen says otherwise.
Step 2. Soak the mixture
Add about 3 cups of water and let everything soak overnight, or at least for 5 hours. This softens the rice and lentils so they blend properly later. It’s not the exciting part of the recipe, I know, but it’s what makes the rest possible. Quiet effort. Strong foundation. We love to see it.
Step 3. Drain the soaking water
Once the soaking time is done, drain all the water. You want softened ingredients, not a blender jar full of old soaking water and regret.
Step 4. Grind the batter
Transfer the soaked rice and lentils to a blender jar along with the cumin seeds, curry leaves, dried red chilies, green chilies, ginger, salt, and enough water as needed. Blend to make a slightly coarse batter. Not totally smooth. That texture is part of what makes Adai Dosa Recipe so satisfying. It’s supposed to have a little grit, a little body, a little attitude.
Step 5. Let the batter rest
Allow the batter to rest for about an hour. This isn’t full fermentation, but it does help the batter settle and the flavors come together a bit. I think it makes the cooked dosa taste rounder, if that makes sense. More like itself.
Step 6. Heat the tawa
Heat a tawa or griddle over medium-high heat. You want it hot enough that the batter sizzles a little when it hits the surface, but not so hot that it burns before it cooks through. This is one of those things that gets easier once you’ve made the first dosa. The first one is often the “let’s all learn together” dosa. That’s normal.
Step 7. Spread the dosa
Pour a ladleful of batter onto the hot tawa and spread it into a thin dosa. It doesn’t have to be perfectly round. Truly. If it looks homemade, that’s because it is homemade. A little wonky is completely fine.
Step 8. Add oil or ghee
Drizzle oil or ghee around the edges. This helps the dosa crisp up beautifully and release from the pan without a fight. Also, this is usually when the smell becomes extremely distracting.
Step 9. Add toppings if using
If you want to add cheese or vegetables, sprinkle them on now. Totally optional. Totally fun. I’d keep the toppings light so the dosa still cooks evenly.
Step 10. Cook until golden brown
Cook the dosa until the bottom turns golden and crisp. If needed, flip briefly, or just fold and remove depending on how thin you spread it and how cooked the top looks. Every pan behaves a little differently, so this is one of those “watch the dosa, not the clock” moments.
Step 11. Serve hot
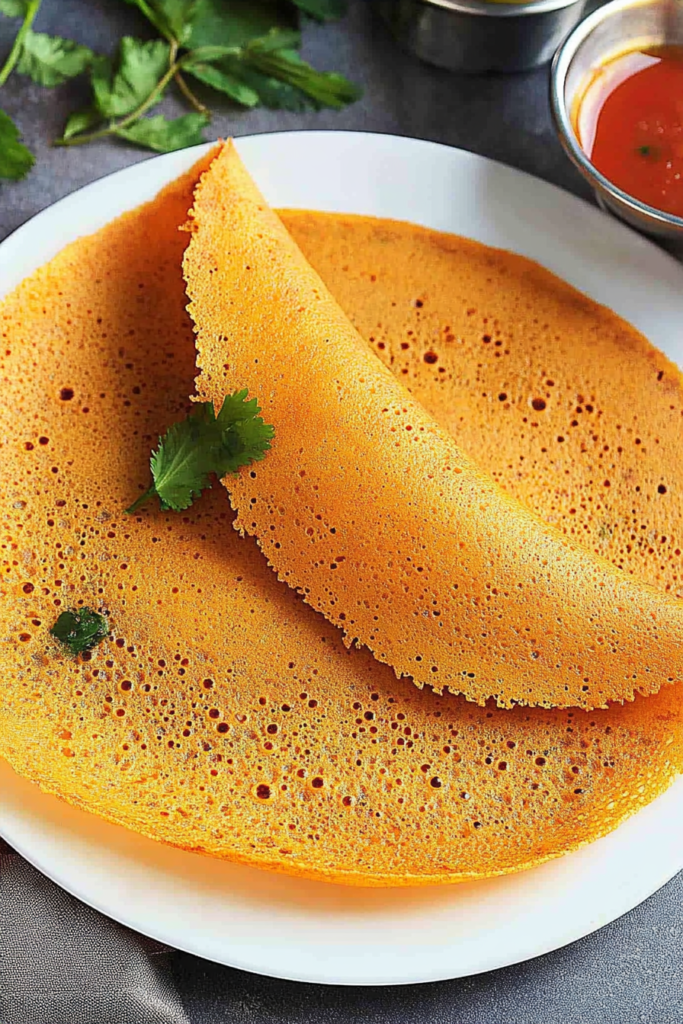
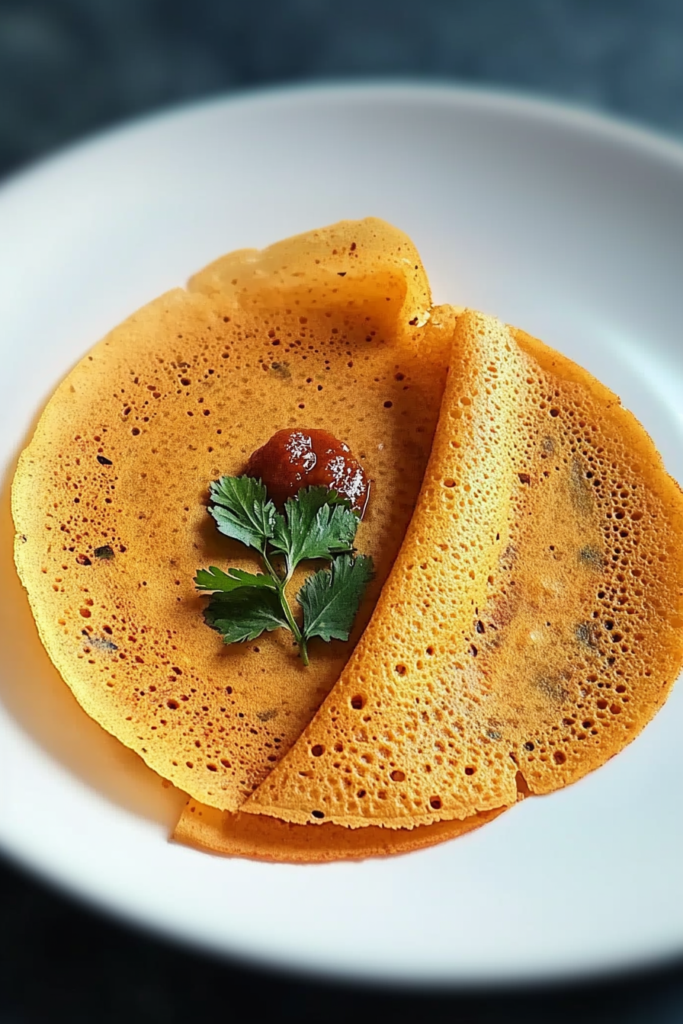
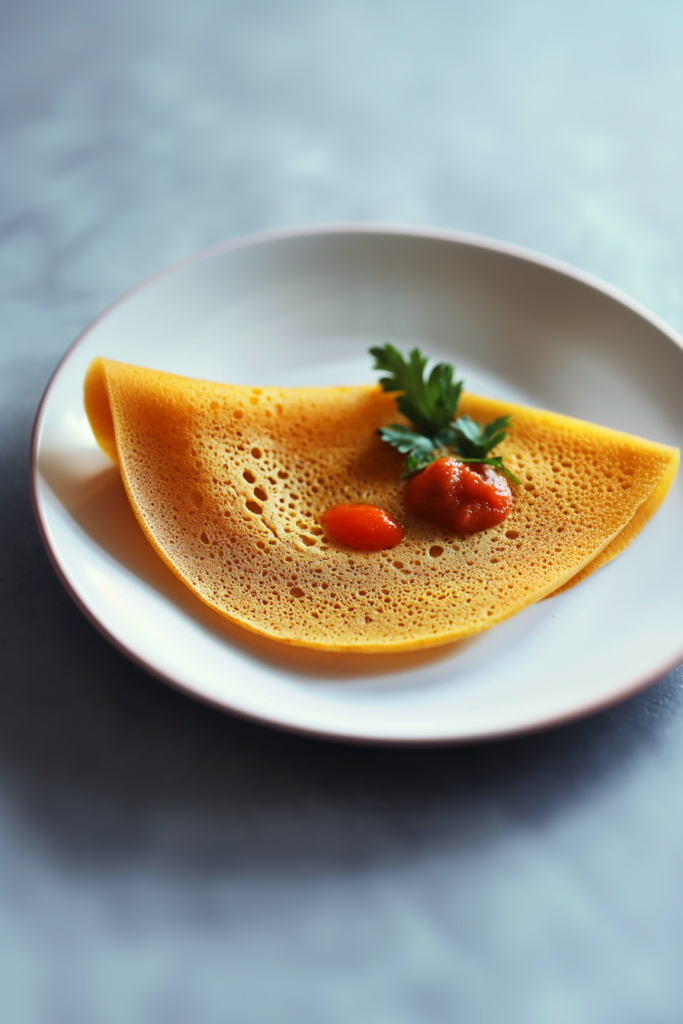
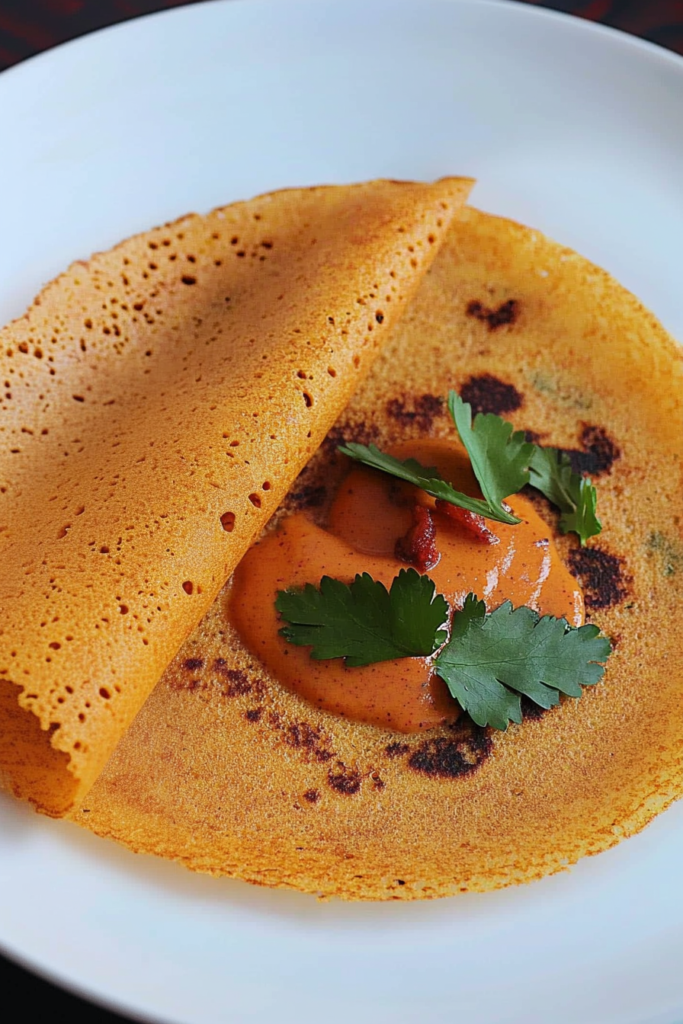
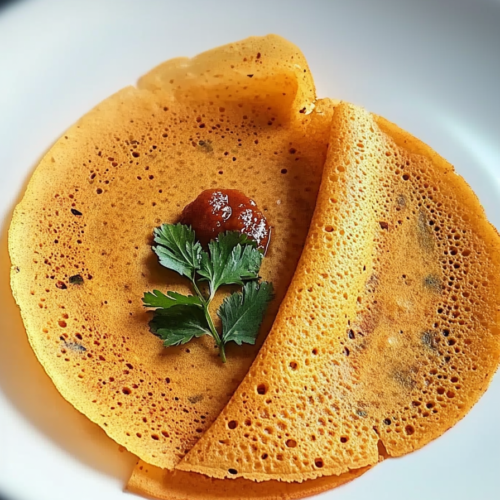
Serve the Adai Dosa Recipe hot with chutney. This is very much one of those dishes that shines brightest right off the tawa, when the edges are still crisp and the middle is warm and hearty and perfect.
Storage Options
This Adai Dosa Recipe is definitely at its best when it’s fresh and hot and straight from the pan. That’s when you get the full crispy-edge experience, and honestly, that’s part of the joy. But the batter stores beautifully, which is actually the more practical part.
You can keep the batter in an airtight container in the refrigerator for up to 2 days. Give it a good stir before using, because it tends to settle a bit. If it thickens too much, add a splash of water and adjust the salt if needed. Very fixable. Very forgiving.
Cooked adai dosa can also be stored in the fridge for about 1 day, but I’ll be honest, it does lose some of that lovely crisp texture. It’s still tasty. Just a little less magical. Reheat it on a skillet if you can instead of in the microwave. The skillet gives it a fighting chance, and I think it deserves one.
I probably wouldn’t freeze the cooked dosa, though the batter can sometimes handle freezing in small portions if necessary. Still, homemade adai dosa is one of those things that really rewards freshness. Immediate gratification, but in a wholesome way.
Variations & Substitutions
One of the things I really like about this Adai Dosa Recipe is that it’s flexible without losing its identity. It still tastes like adai, even if you tweak it a little based on what you have or what kind of morning you’re having.
- Add onions to the batter: Finely chopped onions add sweetness and a little extra texture. Very good if you like more bite.
- Add grated vegetables: Carrot, spinach, or bottle gourd work nicely and make the protein-rich adai dosa feel even more hearty and satisfying.
- Use fewer chilies: If you want a milder dosa, reduce the green or red chilies. It will still be flavorful, just gentler.
- Skip the mint: The recipe already says mint is optional, and yes, it really is. Lovely if you have it. Not tragic if you don’t.
- Use ghee instead of oil: Ghee gives the dosa a richer flavor and a beautiful aroma. A very worthwhile option if that’s your style.
- Make it thicker: Some people like a slightly thicker adai. That works too. It’ll be softer inside and feel even more filling.
- Add cheese: Not the most traditional move, but honestly kind of fun if you’re cooking for kids or just feeling playful. Food can be both wholesome and a little mischievous.
What to Serve With Adai Dosa?
Because this Adai Dosa Recipe is already hearty and flavorful, I like serving it with simple things that complement it instead of competing with it. It doesn’t need much. Just the right sidekick.
- Coconut chutney: This is probably my favorite pairing. The cool, creamy chutney works beautifully with the hot crispy dosa.
- Tomato chutney: Tangy tomato chutney adds brightness and a little extra punch. I really love this with adai.
- Jaggery or butter: A little jaggery or butter with adai dosa gives that sweet-savory contrast some people really adore. And I get it.
- Avial: If you want a fuller South Indian-style meal, avial with this Adai Dosa Recipe is such a comforting combination.
- Idli podi with ghee or oil: Very simple. Very flavorful. Very satisfying.
- Curd: Plain curd on the side is lovely, especially if your dosa is on the spicier side and you want something cool to balance it out.
FAQ
Is Adai Dosa Recipe fermented like regular dosa?
No, not really. This Adai Dosa Recipe needs soaking and a short resting time, but not full fermentation like a classic dosa batter.
Why is my adai dosa not crispy?
Usually it’s one of three things: the batter is too thick, the pan isn’t hot enough, or there wasn’t enough oil or ghee around the edges.
Can I use brown rice instead of white rice?
You can, though the texture may be a little heartier and a bit less crisp. Still good, just different.
Why is the batter supposed to be slightly coarse?
That texture is part of what makes adai dosa different from regular dosa. It gives it body, bite, and that lovely rustic feel.
If you’re looking for a breakfast that feels hearty, flavorful, practical, and genuinely satisfying, this Adai Dosa Recipe is such a good one to make. It’s wholesome without being dull, crispy without being fussy, and comforting in that very real homemade way.
I keep coming back to this Adai Dosa Recipe because it has that perfect mix of nourishing and craveable. It feels like real food. The kind that actually carries you through the day instead of just waving politely at your appetite and leaving. And now I’m curious — would you keep your adai dosa recipe classic with chutney, or would you add your own twist with vegetables, cheese, or a little extra spice?
Adai Dosa Recipe
Ingredients
- 1/4 cup toor dal
- 1/4 cup chana dal
- 1/4 cup urad dal
- 1 cup rice
- 10 curry leaves
- 2 dried whole red chilies
- Salt to taste
- Oil or ghee as needed for cooking
- 2- inch piece ginger
- 2 green chilies
- 1/2 tablespoon cumin seeds
- 3 to 4 cups water
Instructions
Wash the Rice and Lentils
- In a large bowl, combine the toor dal, chana dal, urad dal, and rice. Wash thoroughly until the water runs clear, then drain.
Soak the Mixture
- Add 3 cups of water to the washed rice and lentils. Soak overnight, or for at least 5 hours.
Drain the Soaked Ingredients
- After soaking, drain the water completely.
Prepare the Batter
- Transfer the soaked rice and lentils to a blender jar. Add the cumin seeds, curry leaves, dried red chilies, green chilies, salt, ginger, and enough fresh water as needed for blending. Grind to a batter that is slightly coarse in texture. It should not be completely smooth.
Rest the Batter
- Allow the batter to rest for 1 hour.
Heat the Cooking Surface
- Heat a tawa or griddle over medium to high heat until hot.
Cook the Adai Dosa
- Pour one ladleful of batter onto the hot tawa. Spread it gently into a thin dosa.
Add Oil or Ghee
- Drizzle oil or ghee around the edges of the dosa.
Optional Toppings
- If desired, sprinkle a small amount of grated cheese or finely chopped vegetables over the top.
Cook Until Crisp
- Cook until the bottom turns golden brown and crisp. If needed, flip briefly to cook the other side, or fold and remove once fully cooked.
Serve
- Serve the Adai Dosa hot with chutney of your choice.
Notes